 projects / zigbrew / part two
zigbrew-scales: grind by weight, not by time
I cut my dosing ring in half and put a load cell between the halves. It weighs the portafilter while the grinder fills it and stops the grinder at 18 g, instead of leaving it to the Sage's timer.
This is part two. Part one put two Zigbee relays inside my Sage Barista Express. One of them, zigbrew_grind, can press the grinder's cradle switch for half a second, and that's all this post needs. The machine doesn't get opened again.
The GRIND AMOUNT dial on the Barista Express sets a time, not a weight, and the grams you get in that time drift.
Fresh beans grind faster than stale ones, finer settings are slower, and a nearly empty hopper feeds the burrs differently from a full one. A dose that's 18 g on Monday can be 17 g by Friday, and the shot pulls differently every day. The fix is to weigh what comes out.
What I wanted: pick a dose in grams and have the morning grind land within 0.2 g of it, without standing there watching a scale. Part one already lets the machine press its own buttons. The missing piece was something that could feel the grounds arriving and press GRIND again at the right moment.
So far, it works. The first morning dose landed on 18.0 g exactly, and the next on 18.1 g. That's two mornings, not proof. The ten-dose test is still to do.
fn stop_at(target)
On the Barista Express you start a grind by pushing the portafilter into the cradle, and a second push stops it early. The relay from part one can already make that push. So the whole project comes down to this: weigh the grounds as they land, and send one more push at the right moment.
I could have used a Bluetooth coffee scale and a Home Assistant automation. But then every reading has to go through a Bluetooth proxy, Home Assistant, Zigbee2MQTT and the relay. That takes a third to two thirds of a second, and never the same amount twice. At 1.6 g a second, that wobble alone is most of a gram. So I built my own scale. It decides when to stop by itself, 84 times a second, and talks straight to the relay over a Zigbee binding, a direct device-to-device link with no hub in the middle. Home Assistant only sets the target and writes down the result.
The safety net is the machine's own timer. GRIND AMOUNT is turned up so the timed dose always runs a little past the heaviest target. If the scale, the network or the relay drops out, the grind still ends on the timer, a gram or two heavy. The worst case is a heavy dose, never a grinder that won't stop, because the scale only sends short presses and never holds a switch on.
enum where_the_scale_goes
The hard part was where to put a scale on a machine that holds the portafilter by its ears, on two hooks, right under the grinder outlet with no room to spare. I started with two ideas. Direction A was a cup scale shaped like a portafilter that hangs in the cradle on its own; you'd tip the cup into the real portafilter afterwards. It got as far as a fit test and a parts order. Then I wondered whether it would be crazy to weigh straight into the portafilter instead. It wasn't, and that's Direction B, the one I built.
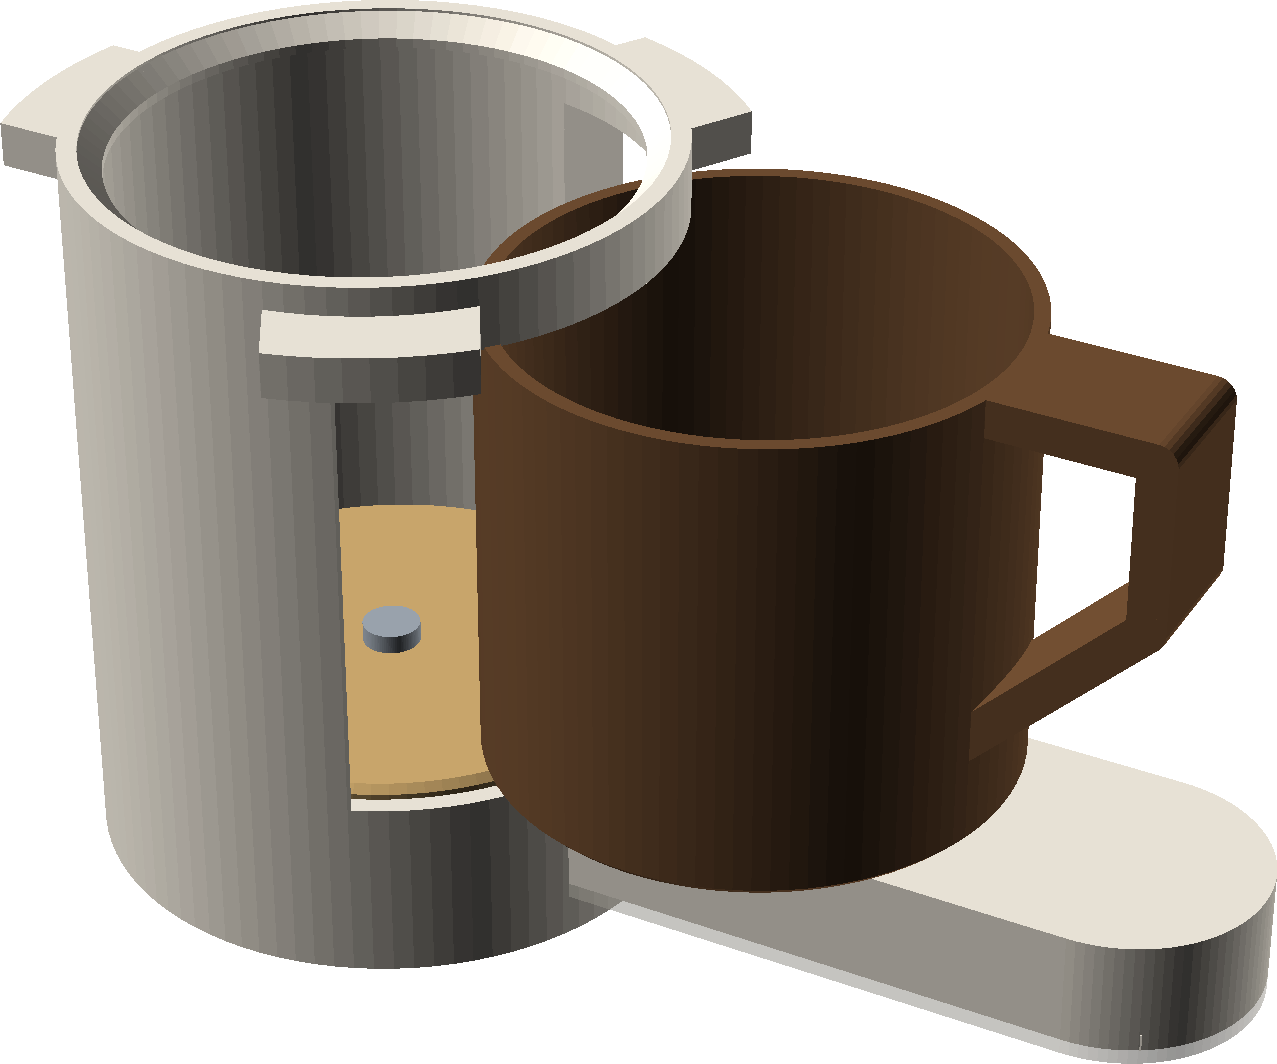
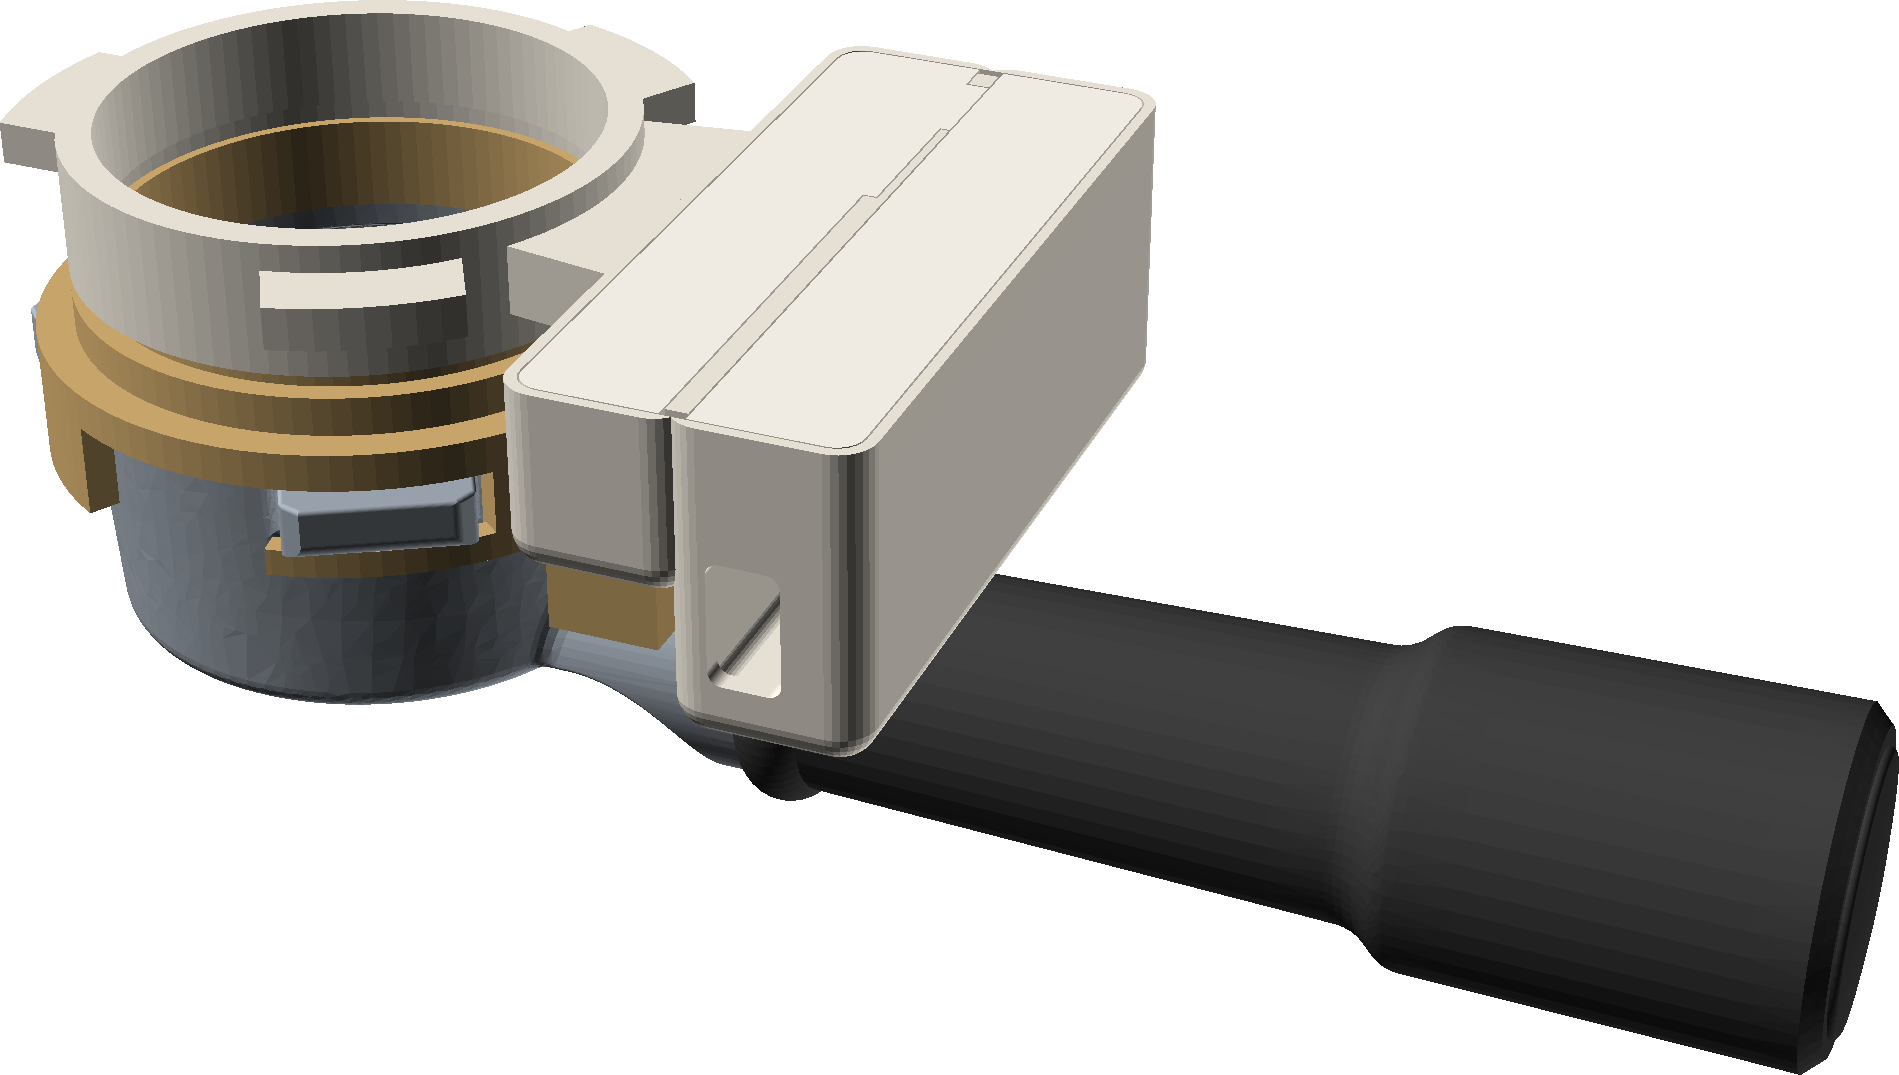
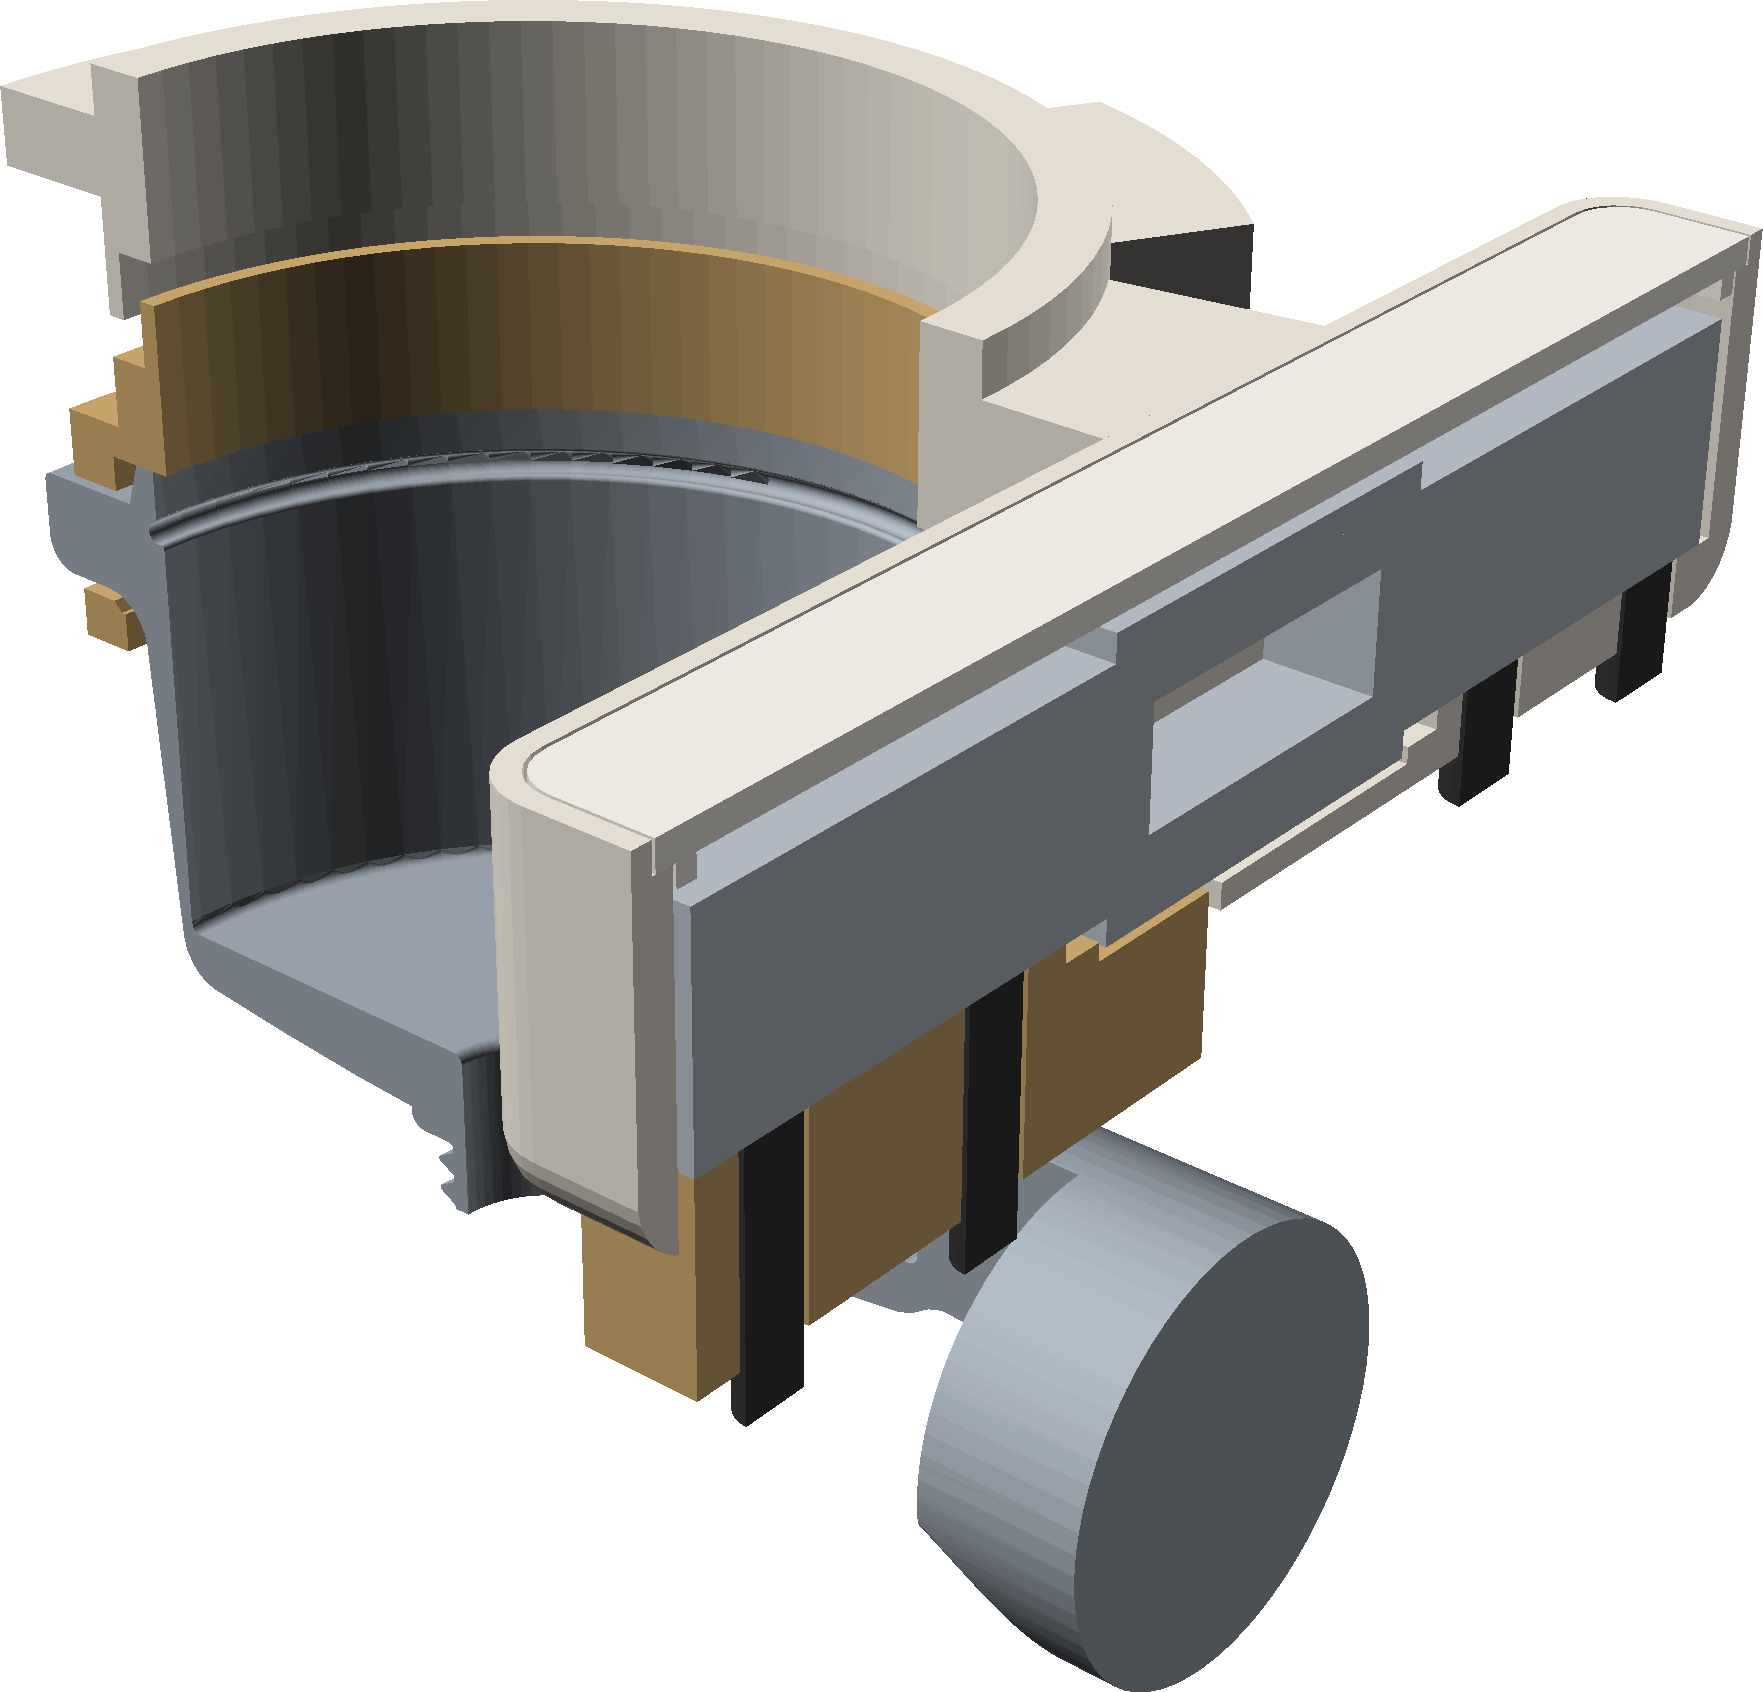
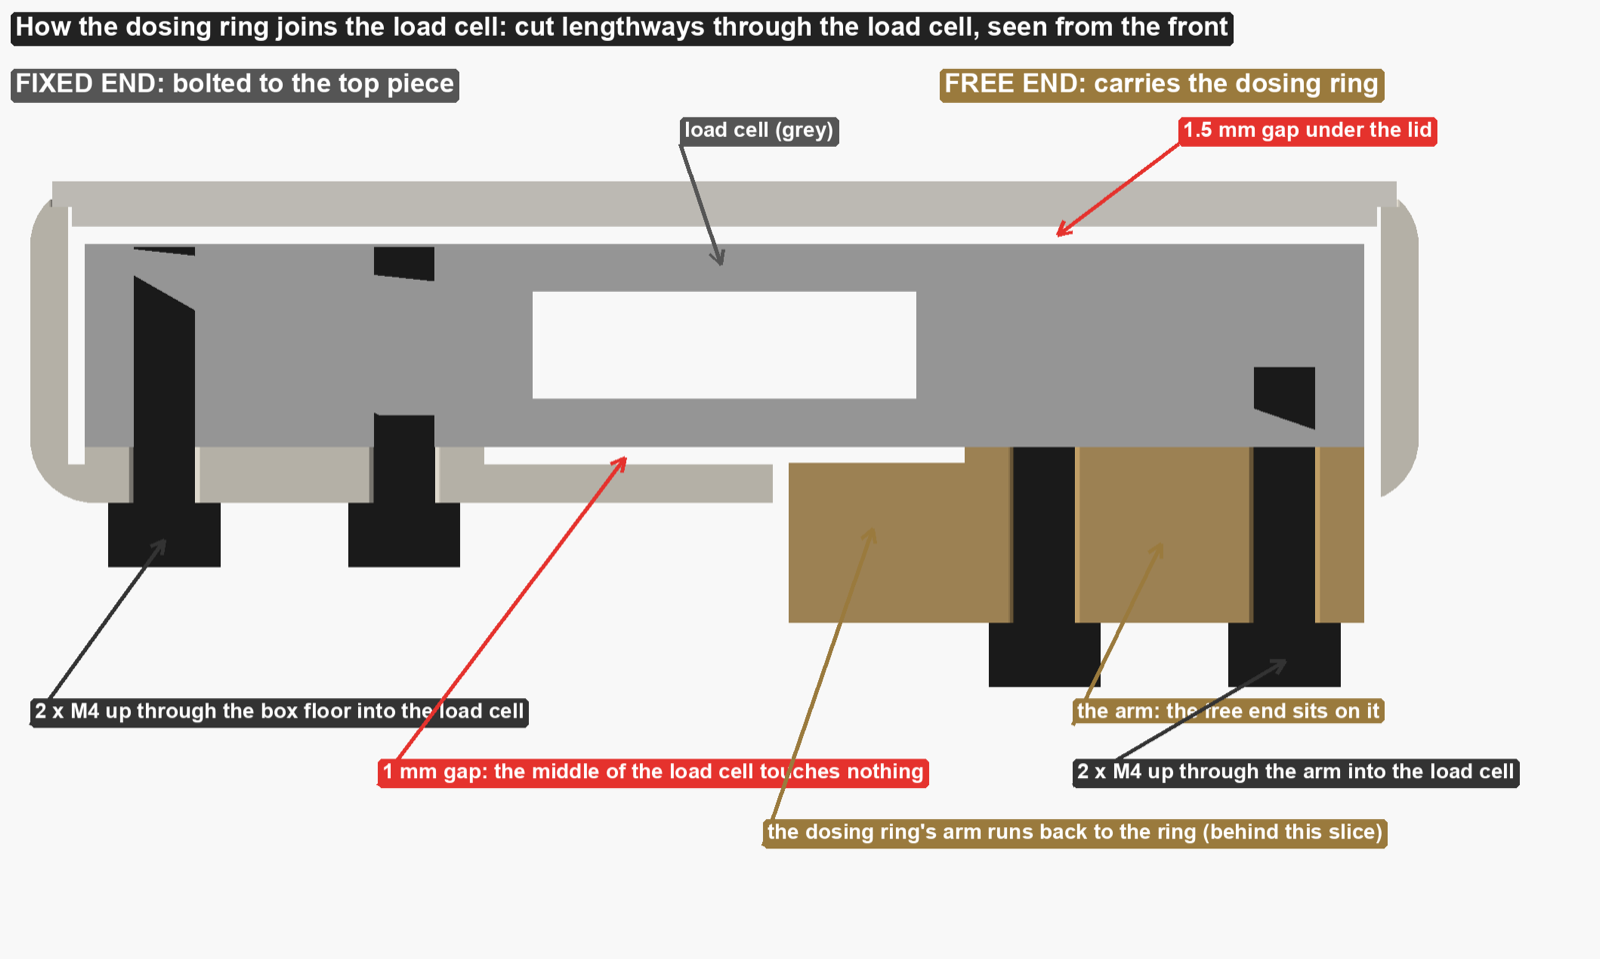
I already use a dosing ring, which clips onto the portafilter's ears and hangs on the cradle's hooks. B is that ring, cut in two, with a load cell as the only thing joining the halves. The top half hangs on the hooks and is never weighed. The bottom half grips the portafilter exactly as the ring does today. Everything below the cut, portafilter and coffee, hangs from the cell.
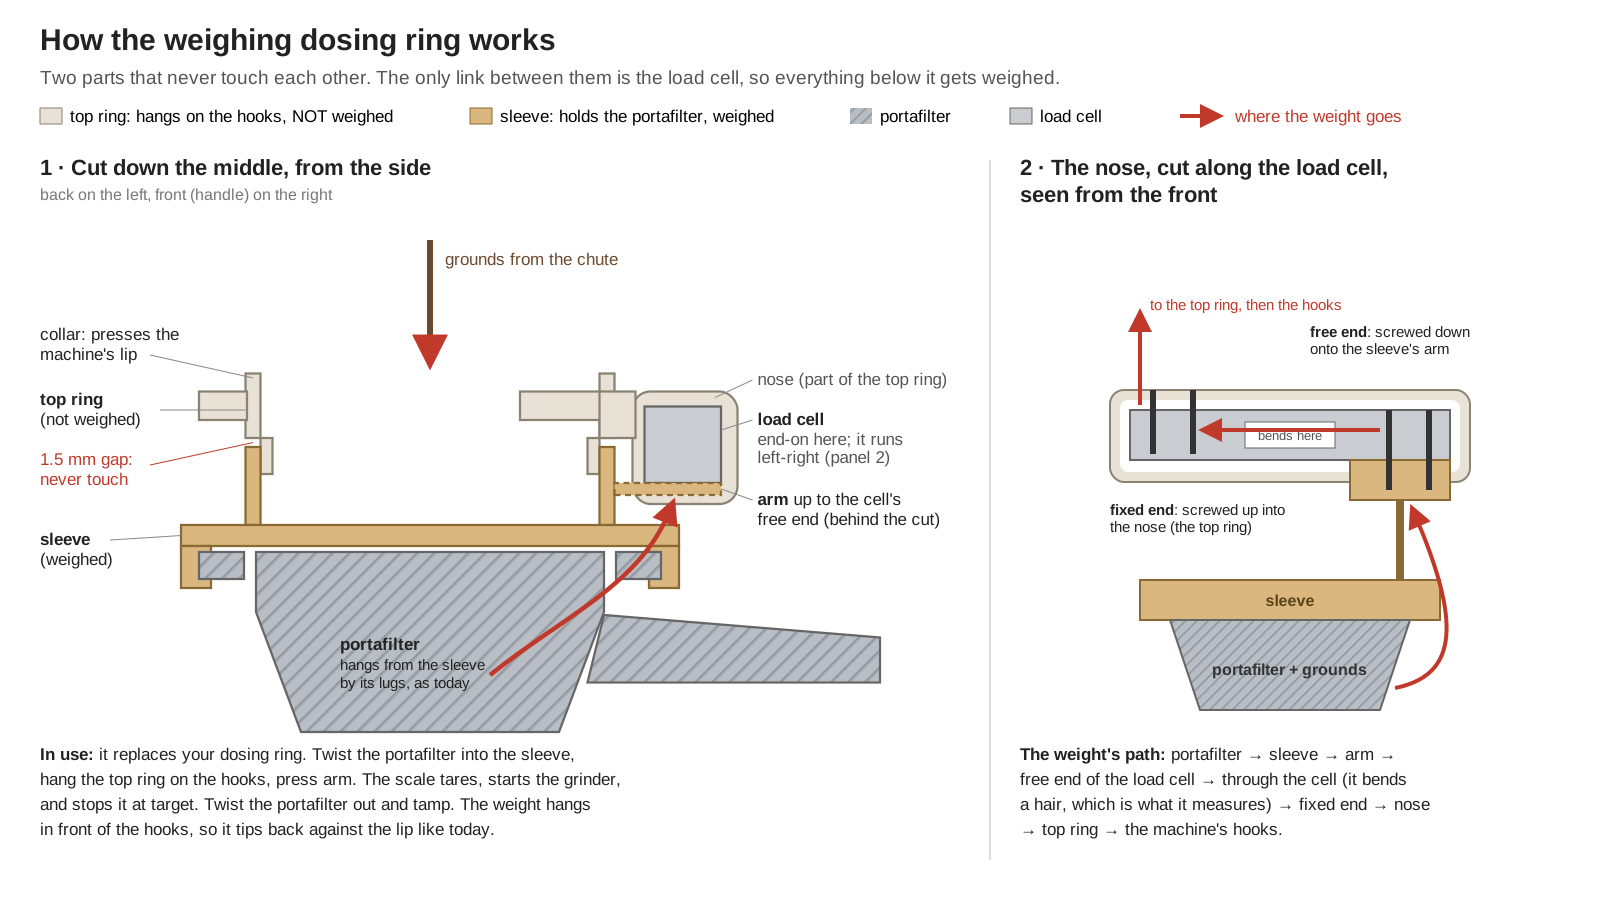
No cup to tip, no transfer step, nothing changes in the morning. The portafilter hangs where it hangs today. And balance comes free: the portafilter's weight reaches the top ring at the nose, in front of the hooks, so the ring tips back against the machine's lip the way the real dosing ring does with a handle on it. Direction A's cup scale had its weight behind the hooks and drooped.
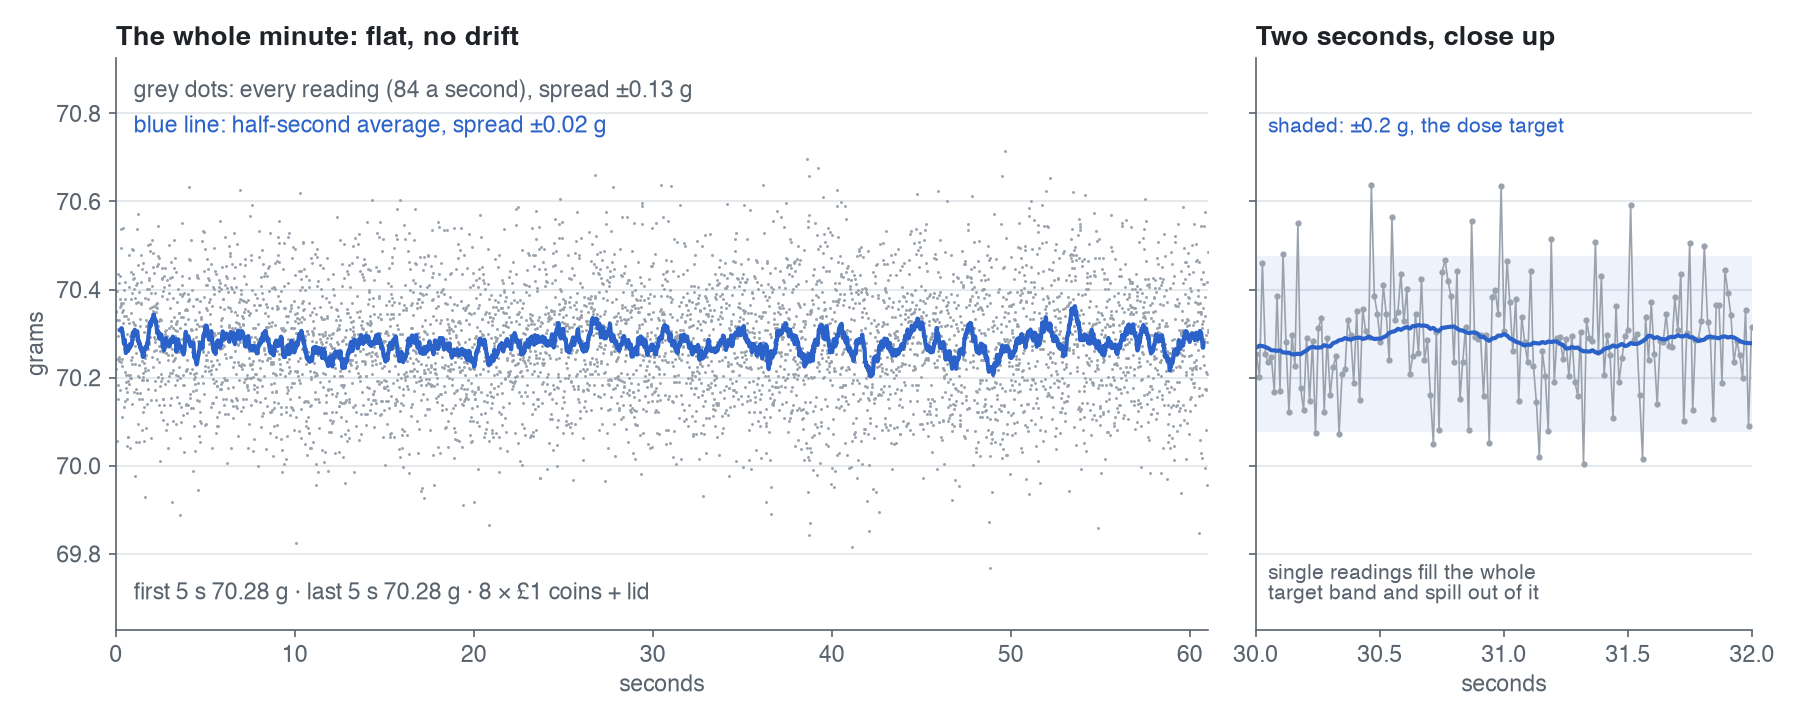
A 1 kg load cell instead of 100 g, because it has to carry the 492.5 g portafilter before any coffee goes in. Ten times the range means a tenth of the resolution, so each reading is noisy to ±0.13 g instead of ±0.02 g. The firmware's trend line mostly copes: on the ring's real noise, the simulator puts 95% of doses within 0.23 g, a hair outside the ±0.2 g goal. And no wire: the ring goes in and out of the cradle with the portafilter every dose, so it had to run on a battery.
const parts
| Item | Notes | Paid |
|---|---|---|
| Seeed XIAO ESP32-C6 | Zigbee radio, deep sleep, LiPo charger on board. Thumbnail-sized. | £5.20 |
| Adafruit HX711 | 24-bit load-cell ADC. Set its RATE switch to H for 80 readings a second (mine measured 84); the generic boards are stuck at 10, too slow to stop a grind on time. | £9.60 |
| 1 kg single-point bar load cell | 80 × 12.7 × 12.7 mm. M5 threads at the wire end, M4 at the other. Comes with a generic HX711 board you won't use. | £3 |
| LiPo 502030, 250 mAh | With a protection board. The plug comes off, one wire at a time, and the leads go to the XIAO's BAT pads. | £4.19 |
| 2 × M5 × 16, 2 × M4 × 16 socket caps | Fixed end up through the box floor, free end up through the sleeve's arm. Four screws hold the whole thing together. | pennies |
| About 85 g of PETG | Top ring, collar, sleeve, two lids, electronics carrier. PETG, not PLA: it sits next to a hot machine. | ~£1.70 |
| 30 AWG silicone wire | Load cell to HX711, HX711 to XIAO. | pennies |
About £24 in the ring. That doesn't count the trial prints. Every printed part went through several versions (the electronics carrier is on its seventeenth), so the test prints used several times that filament again.
The scale is 5 V USB and a small battery, and it never touches the machine's wiring: the relay and its mains tap are already in from part one. The only real risk isn't electrical. A press on an idle grinder starts it, so anything that presses at the wrong moment starts a grind nobody asked for. The firmware only presses after it's been armed, and it counts its presses.
copy the_dosing_ring()
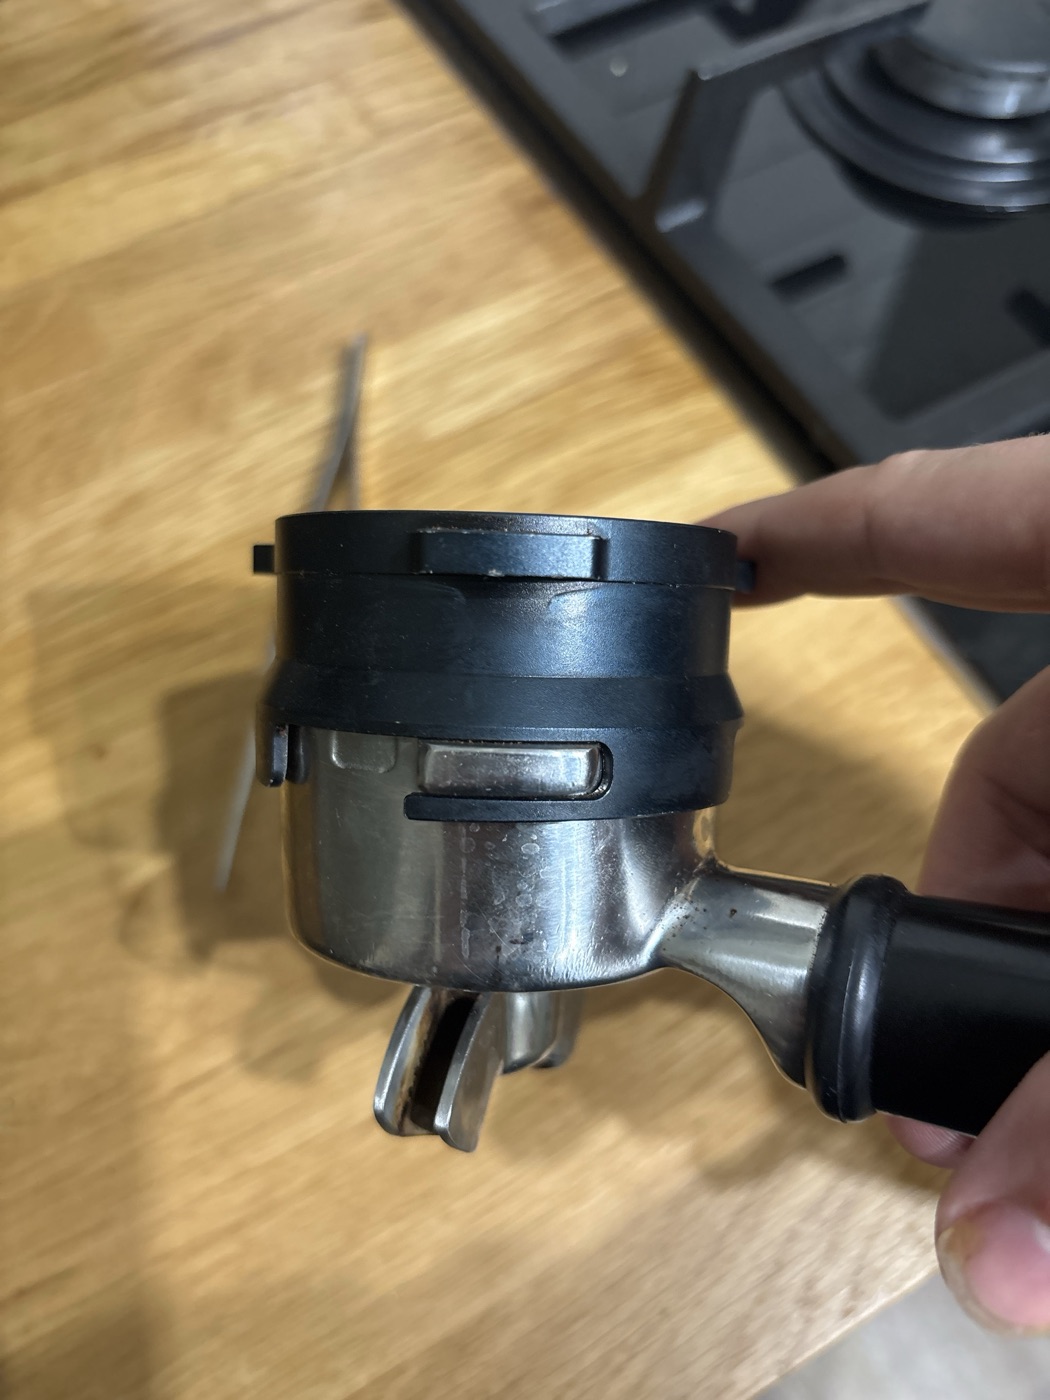
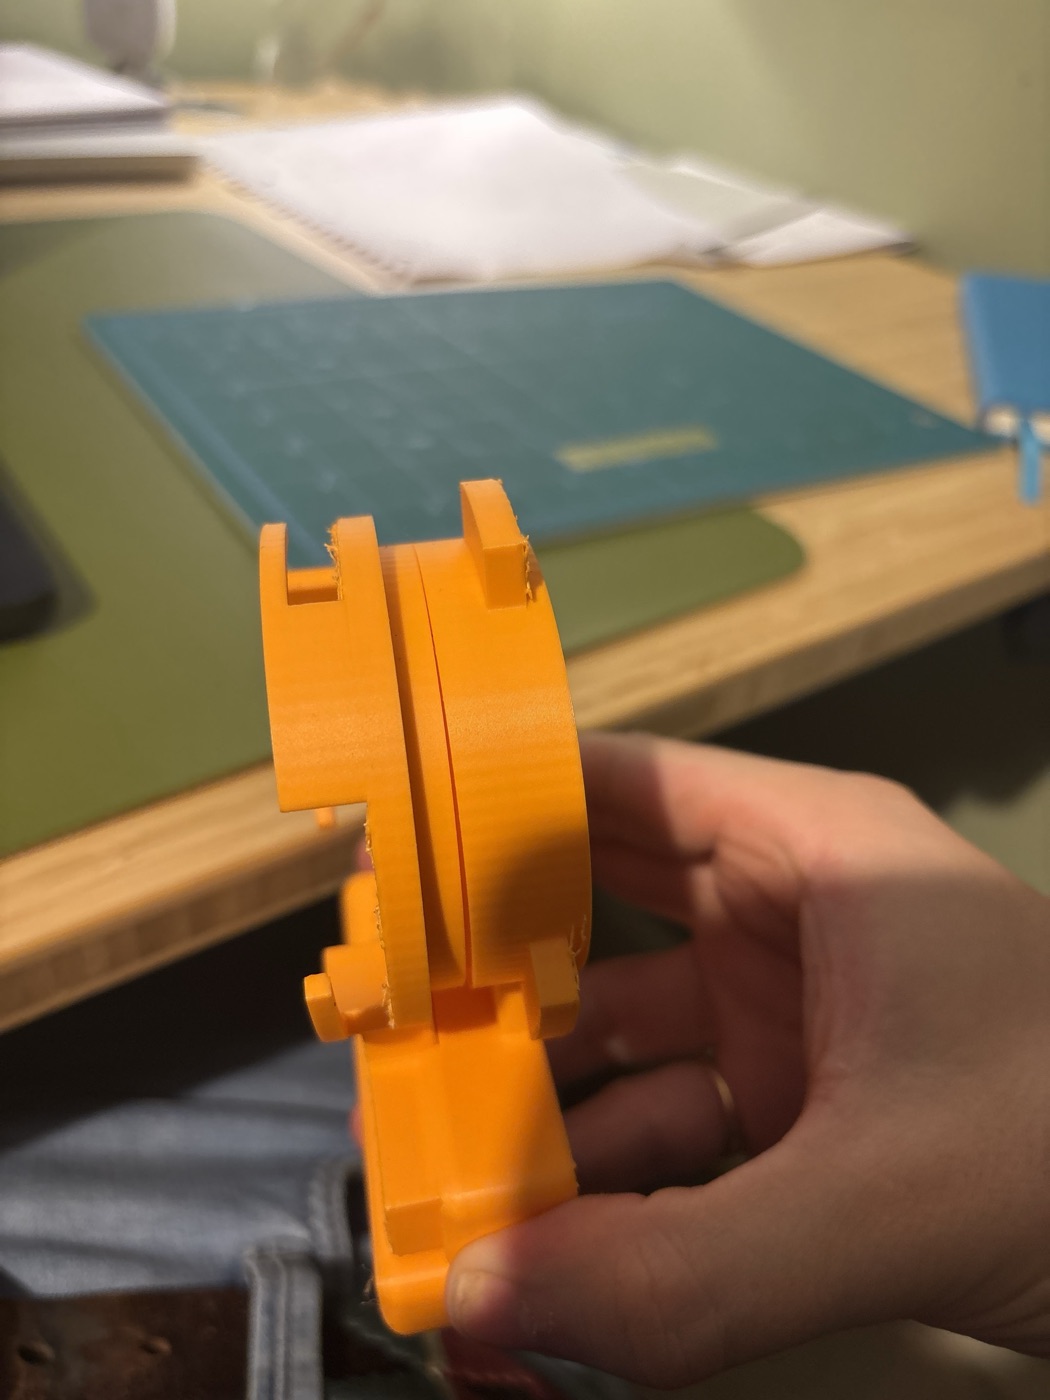
First, copy the dosing ring: the portafilter's ears go up into J-slots, twist, and a springy finger holds each one. Calipers gave the sizes; they're in the CAD.
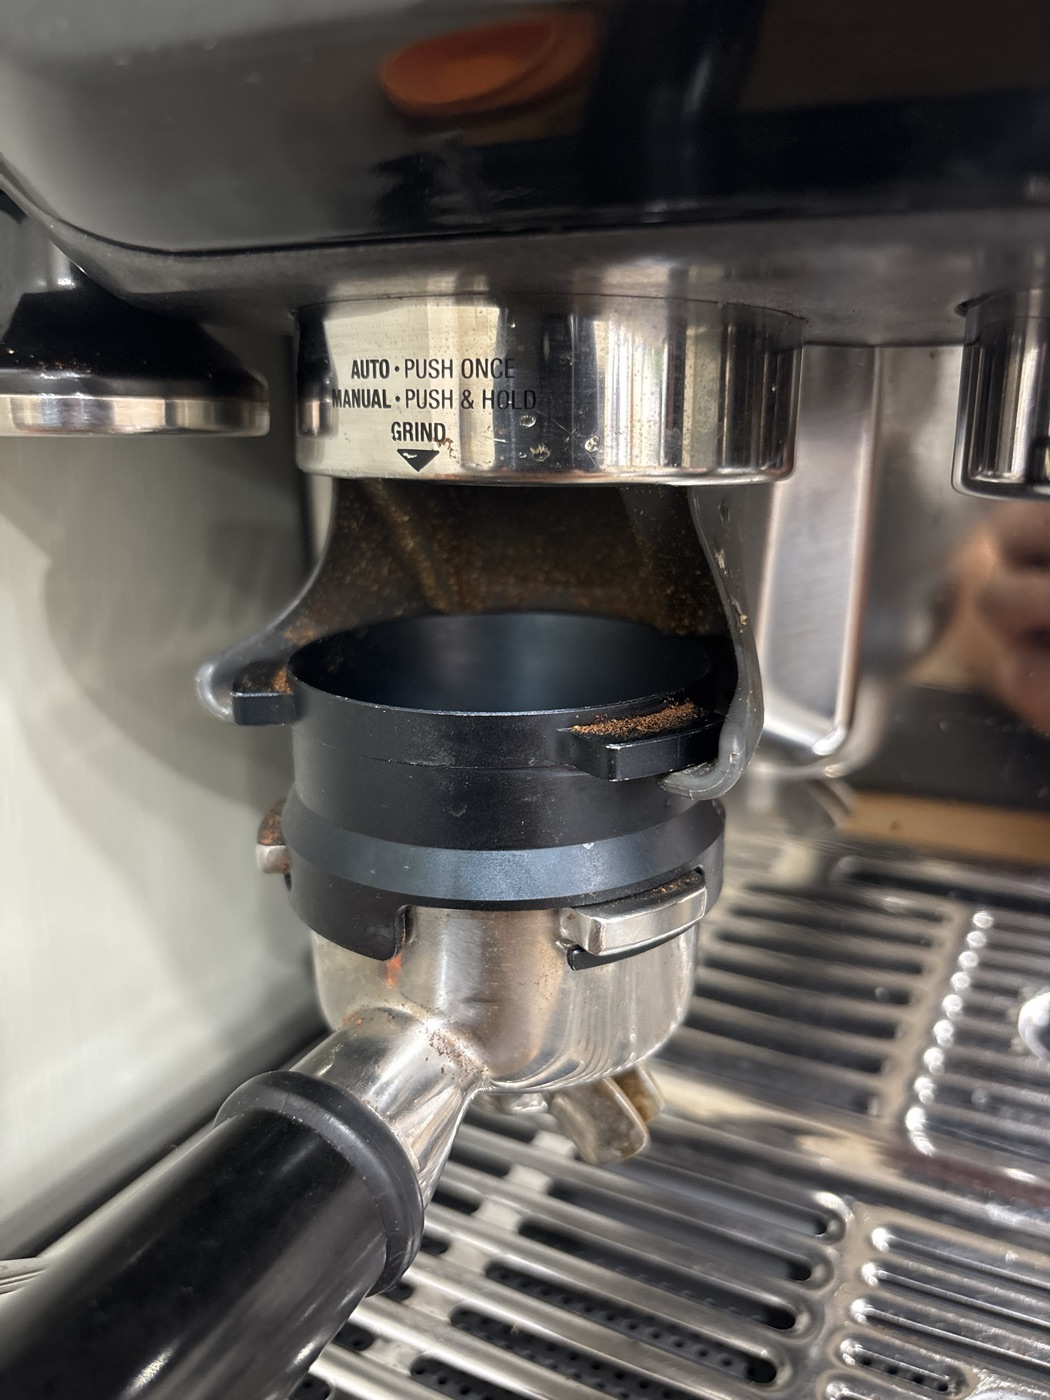
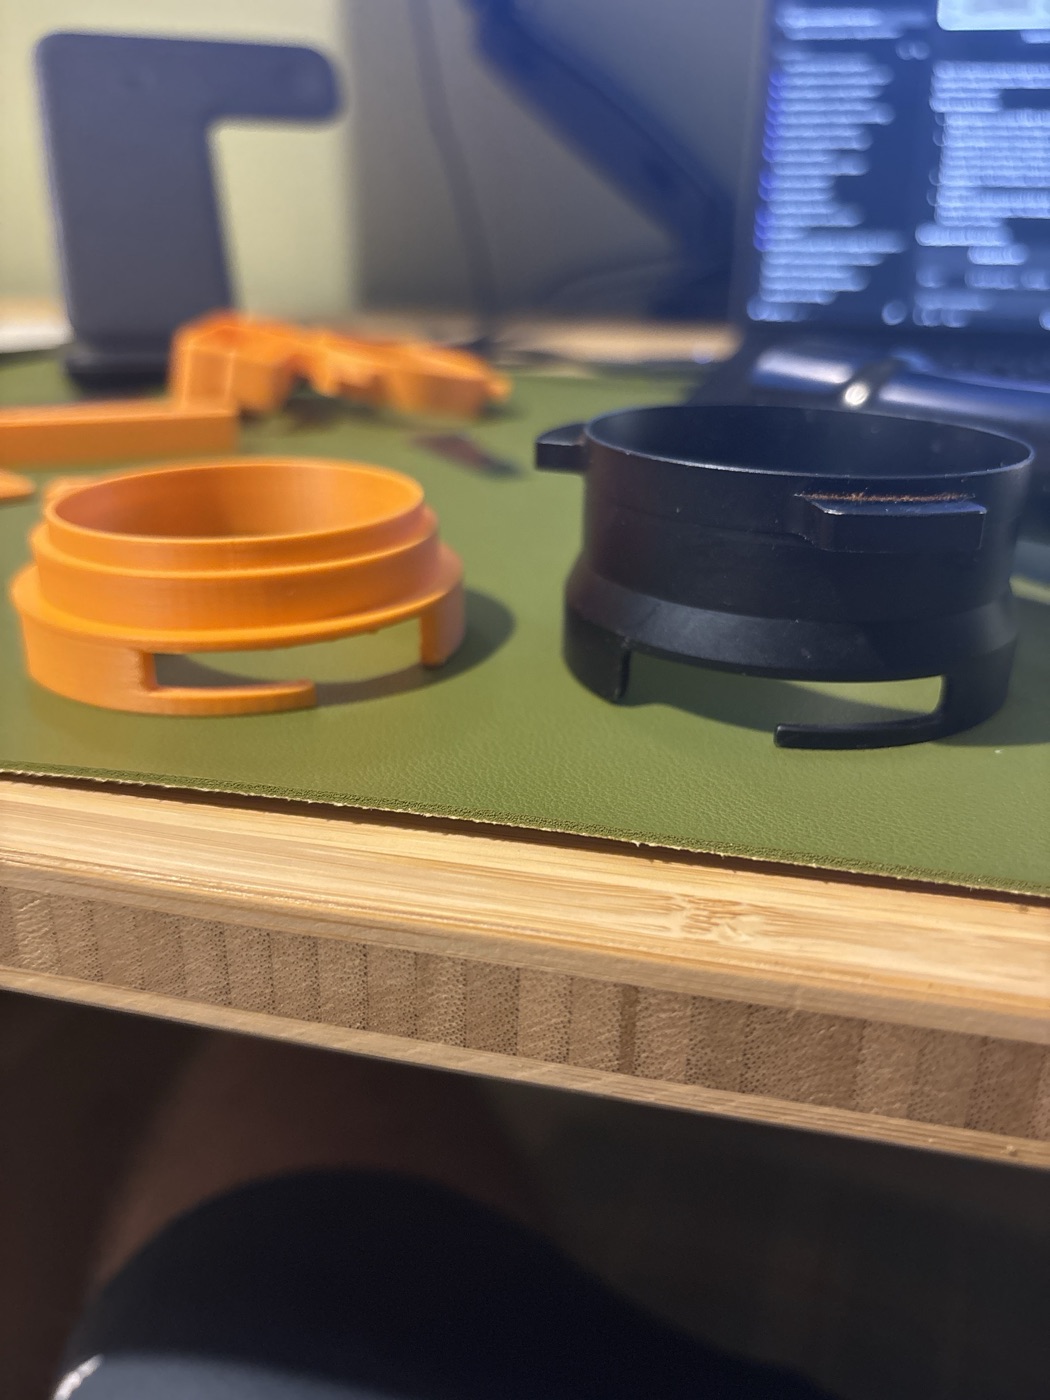
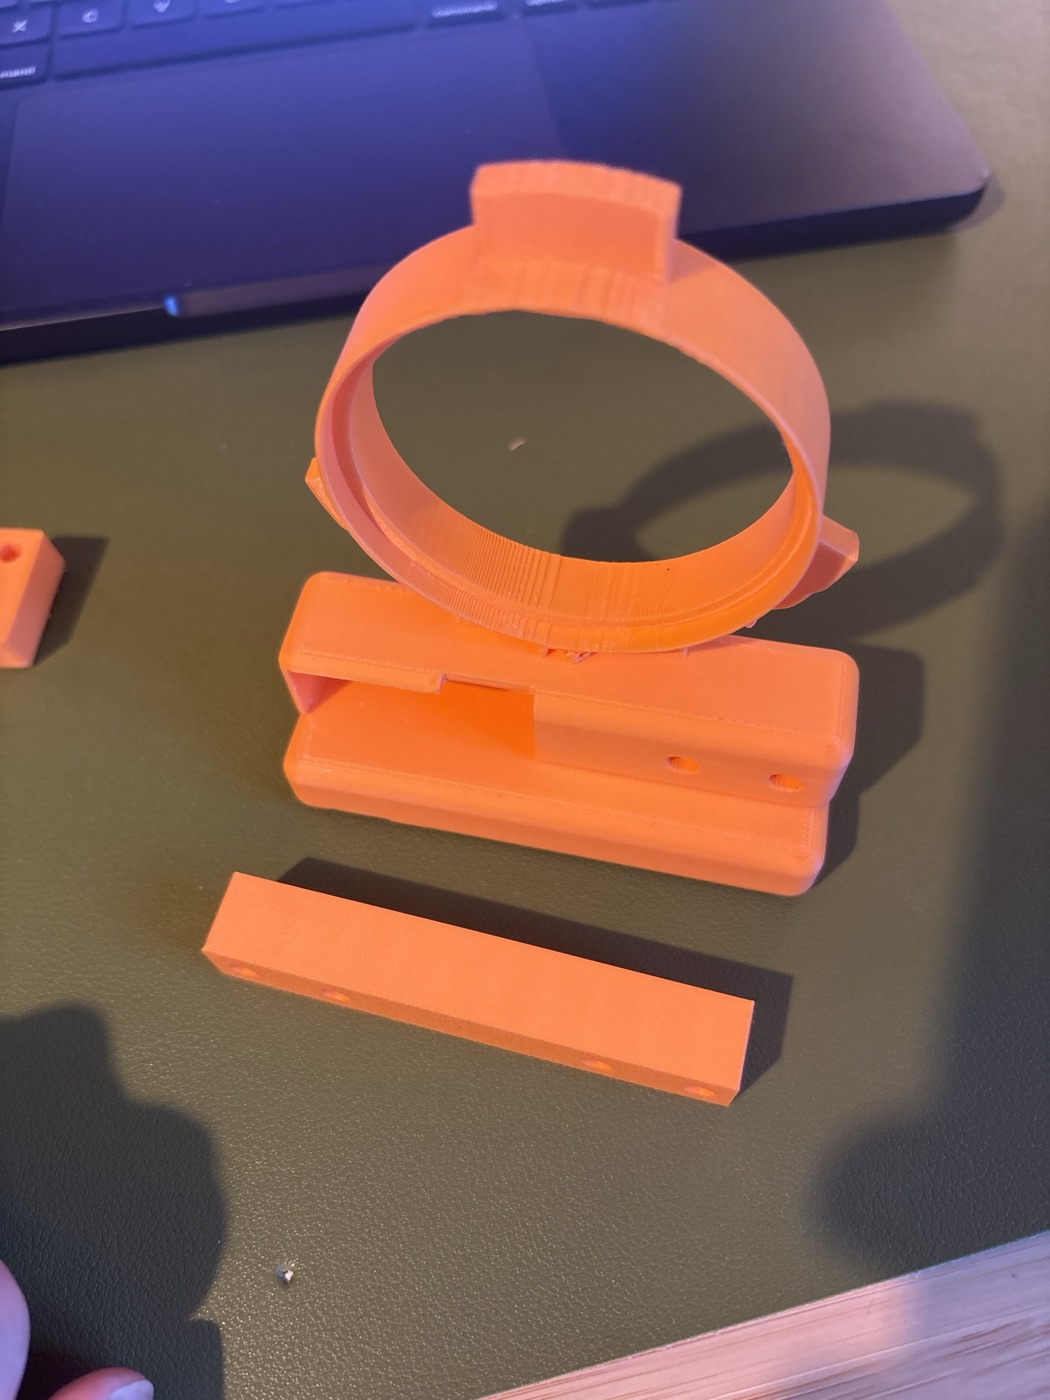
split it_in_two()
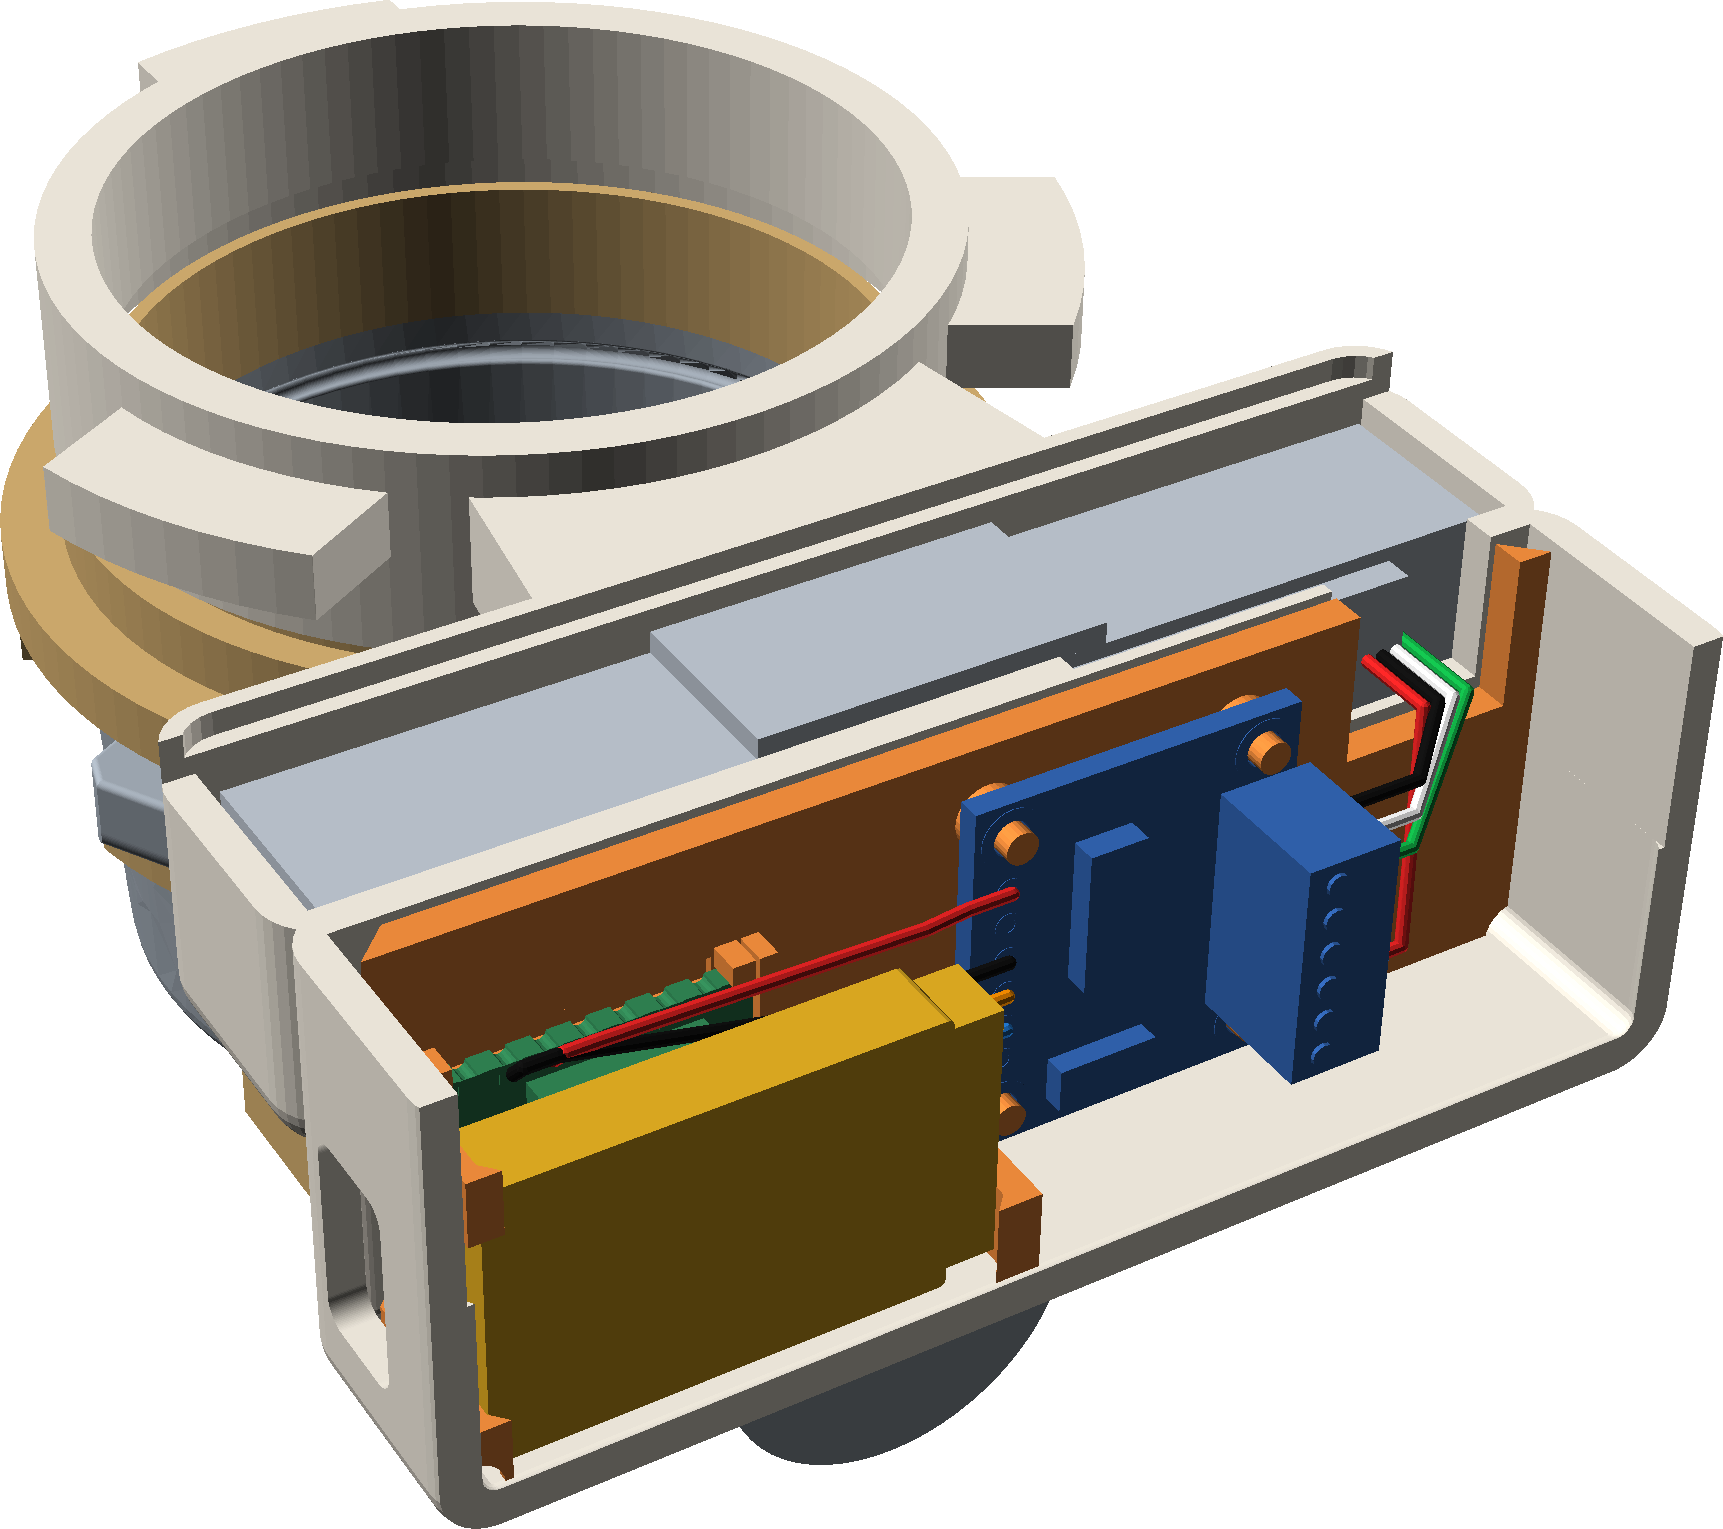
The one rule for the whole part: nothing that's weighed may touch anything that isn't. The two halves sit 2.5 mm apart everywhere. A Z-shaped labyrinth in the wall stops grounds climbing out through the gap, and nothing narrows the bore: it's tamper-sized all the way through, so I tamp through the ring like today. The load cell keeps a millimetre clear of its box all round.
The CAD refuses to render if any of that is violated. By the end there were 24 touch checks, each one an OpenSCAD intersection that has to come back empty, and a deliberate wrong placement that has to trip it, so the check is known to work. The useful ones are the assembly checks: can the load cell get into the box, can the sleeve come up from below, can the lid go on. The first draft passed every clearance check and could not be put together.
wire the_bench()
Four wires from the cell to the HX711's screw terminal, four from the HX711 to the XIAO: data, clock, 3.3 V and ground. The clock pin is D2 on purpose: it's a low-power pin the C6 can hold high through deep sleep, which powers the HX711 down on battery. A printed jig holds both boards at exactly their spacing on the carrier, so the wires come out the right length and the wired pair lifts straight across.
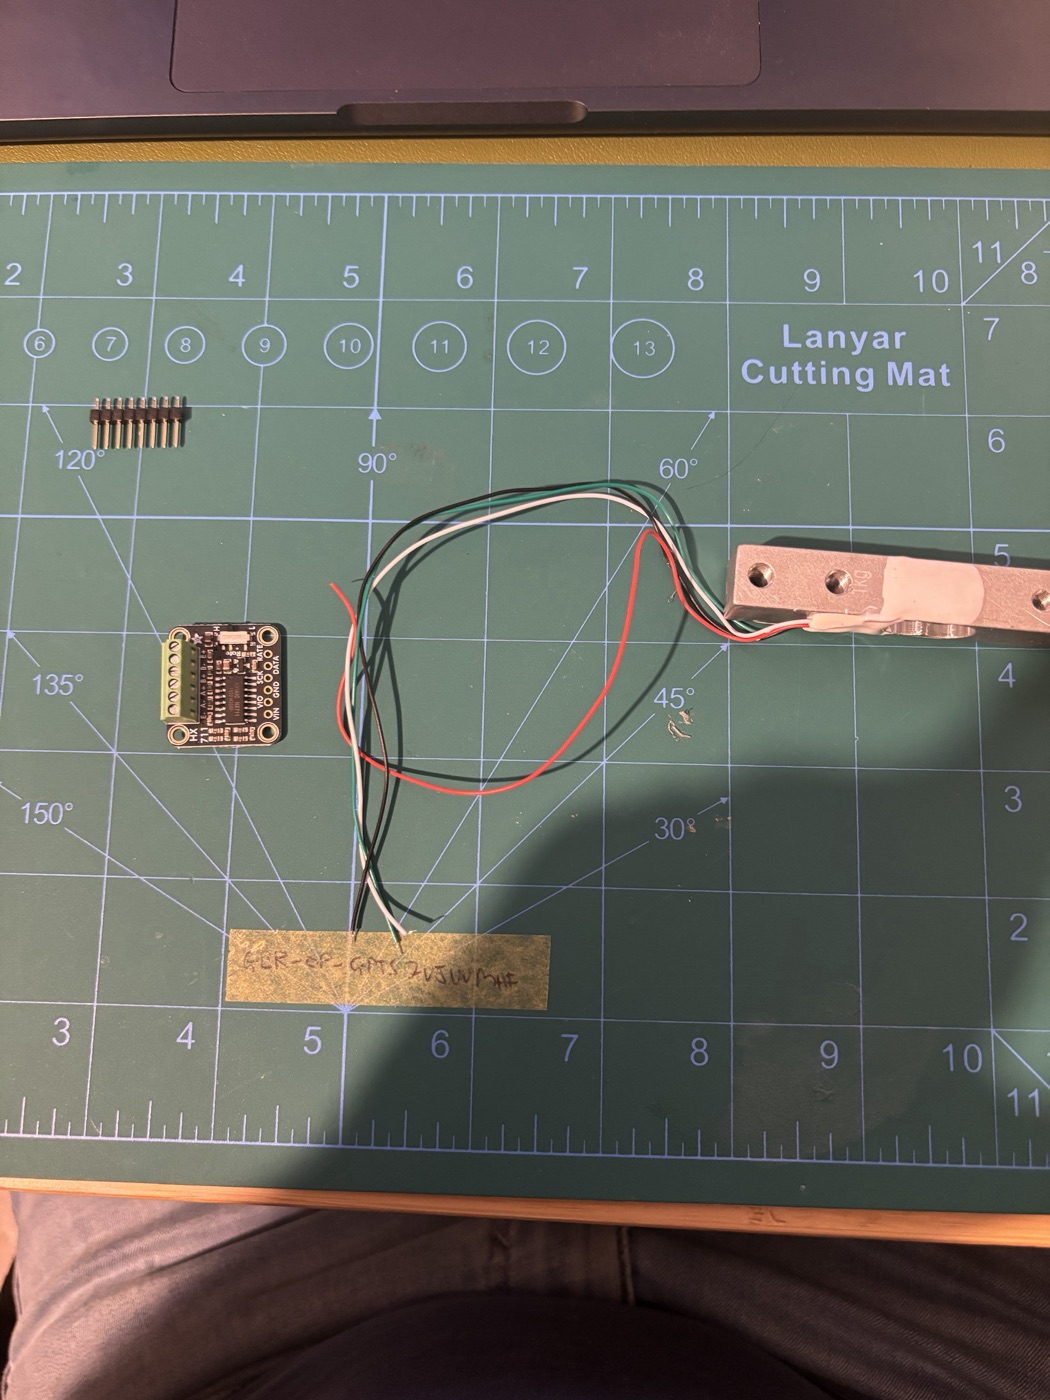
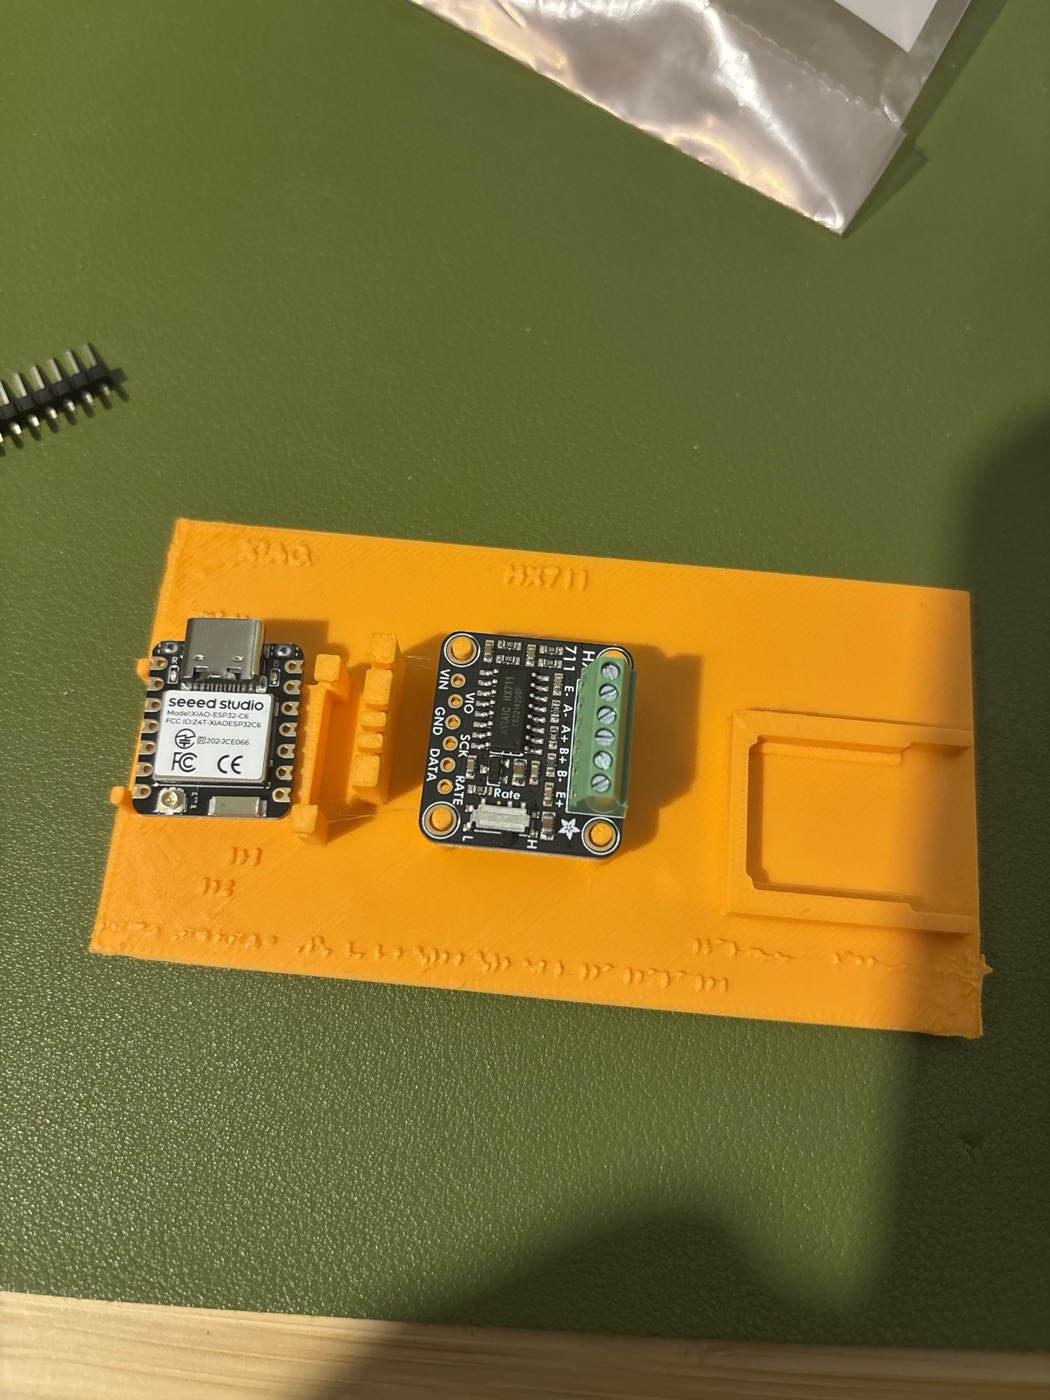
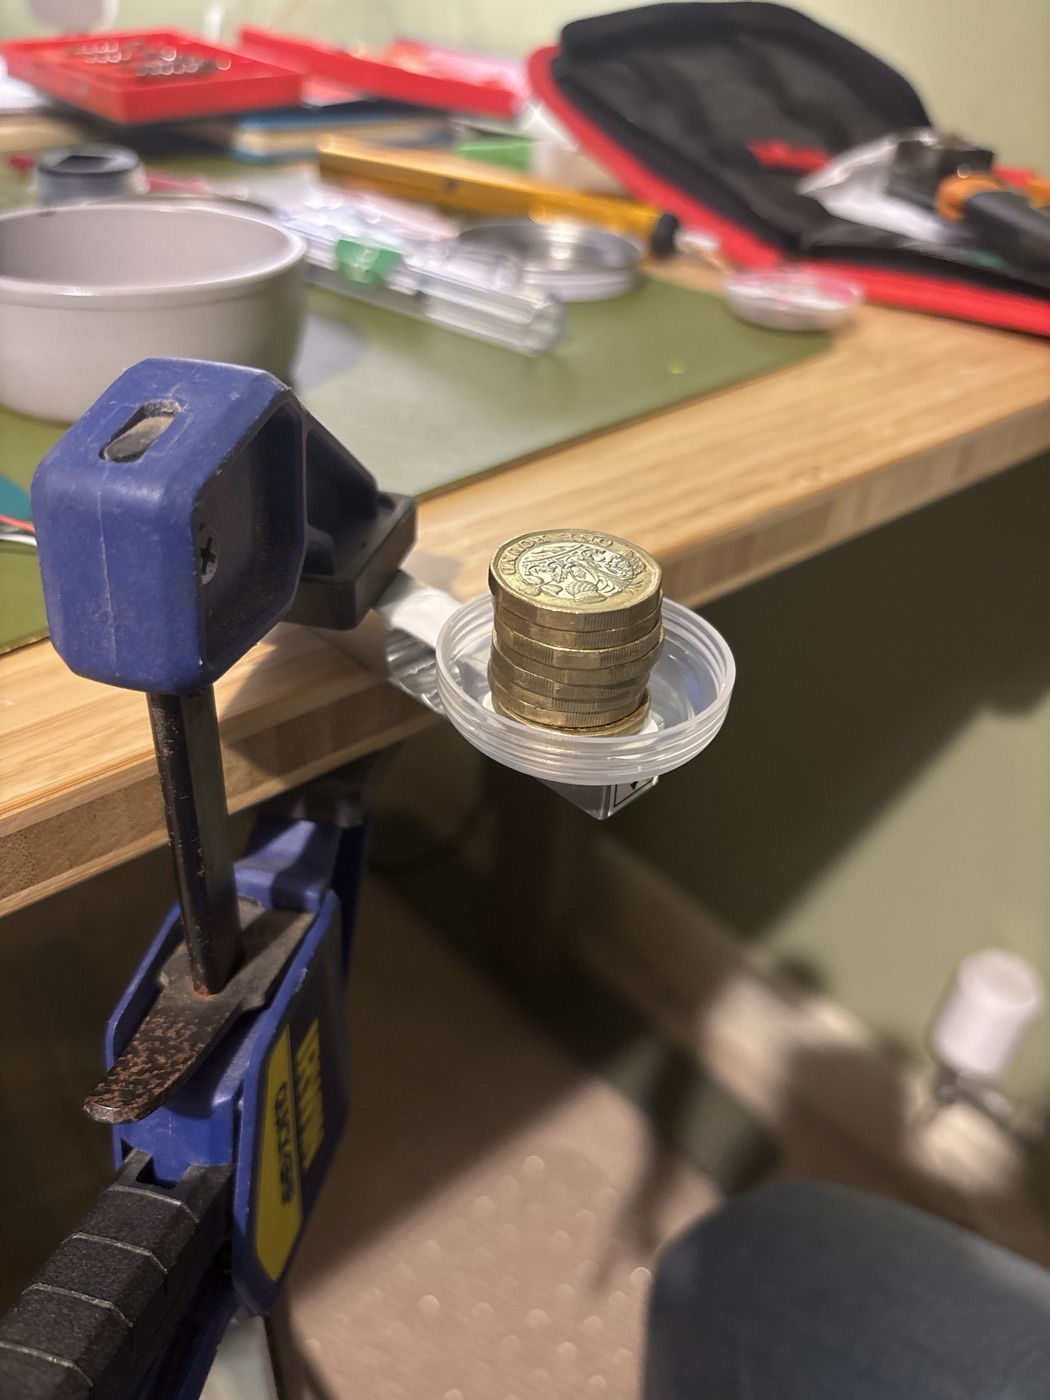
I found one wiring mistake in a photo before powering up: red was on the HX711's VIO pad, one along from VIN. At first power-up it read 84 times a second, so the RATE switch really was on H, and calibration came out at 1,074.8 counts per gram. With the coins left on for a minute, the reading stayed flat with no drift, but every single reading was noisy to ±0.13 g.
simulate before_you_grind()
The dose logic is a pure C++ header the firmware and a desktop simulator share. The simulator runs it against a model grinder with a start delay, a flow rate, stop latency with jitter, spin-down, grounds in the chute, motor vibration and a GRIND AMOUNT timer, then throws scenarios at it: a thousand doses, the timer ending the dose right at the stop point, 20% of commands lost, a slow link, the cup put on and taken off, a weight dropped on an idle scale. Every scenario runs at four noise levels, the last of which is a recorded minute of the real assembled ring, replayed from a random point, because real noise has spikes and wander that Gaussian noise doesn't.
It found real bugs before any hardware existed: five in the first controller, each caught by a scenario. The nastiest was a stop press landing just after the timer had already ended the dose. On an idle grinder a press is a start, so it quietly ground a second dose, and nothing noticed. The most surprising was the Arduino Zigbee library, which silently refuses to send an On unless it made the binding, so the firmware builds the command itself.
It refuses if the scale isn't calibrated. The tare takes out overnight creep, which is 0.02 g in ten minutes on this cell.
If the machine was off or the hopper empty, the grinder didn't start, and a second press would start it with nobody watching. So it doesn't press again.
No "is it still running?" check first. There used to be one, and on the ring's noise it came in just under its own bar about once in two hundred doses, held off, and the grinder ran on to the timer: 23 to 34 g in an 18 g basket. I was overcomplicating it, so now it just presses.
That covers a lost command and a press that landed just after the timer and restarted it. Either way one more press is a stop, and the worst case is a gram or two.
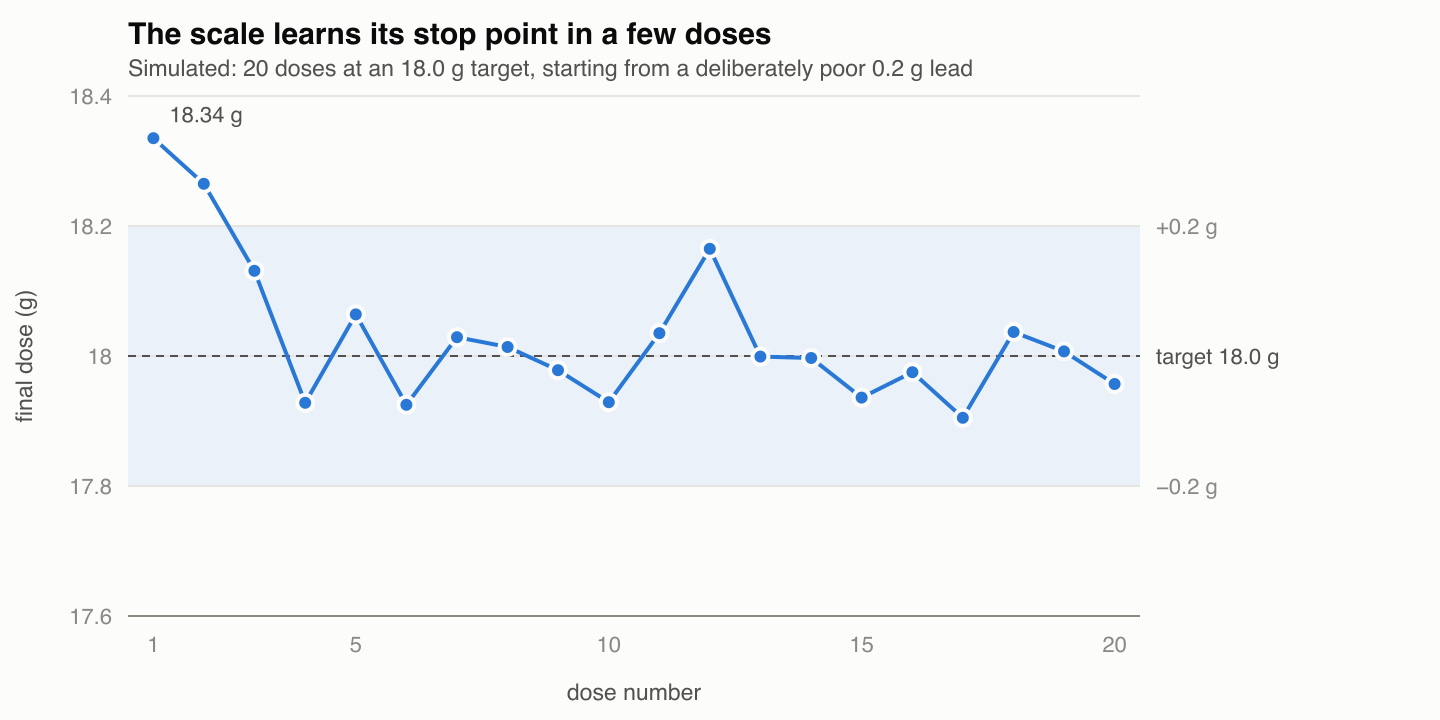
lead ← lead + 0.3 × (final − target), but only from doses it stopped itself with no rescue presses. The final weight and the new lead go to Home Assistant.
| 1,000 doses on the recorded noise | Result |
|---|---|
| Missed stops, runaways, extra presses, second doses | none |
| 95% of doses within | 0.23 g |
| Outside ±0.4 g | 3 of 980 |
| Timer ending right at the stop point, 400 runs | 75 restarts, all caught, worst +1.5 g |
| 20% of commands lost | no runaways, worst +6.9 g. If all four presses go, the timer ends it: 1 dose in 625 |
The lossy-link and slow-link rows are the argument for the direct binding. Stop-timing jitter goes straight into the dose.
grind for_real()
Once assembled, the ring went into the real cradle with the portafilter clipped on, still powered from the laptop's USB. First the boring checks, which all passed: the sleeve hangs free (every poke comes back to the same reading), re-clipping the portafilter repeats to 0.2 g, the calibration from the bench holds (two £1 coins read 17.49 g of 17.50), and noise is the same ±0.13 g as the bare cell. The portafilter weighs 492.5 g. Then I bound the trigger endpoint to zigbrew_grind in Zigbee2MQTT and ran an actual grind to see what would happen.
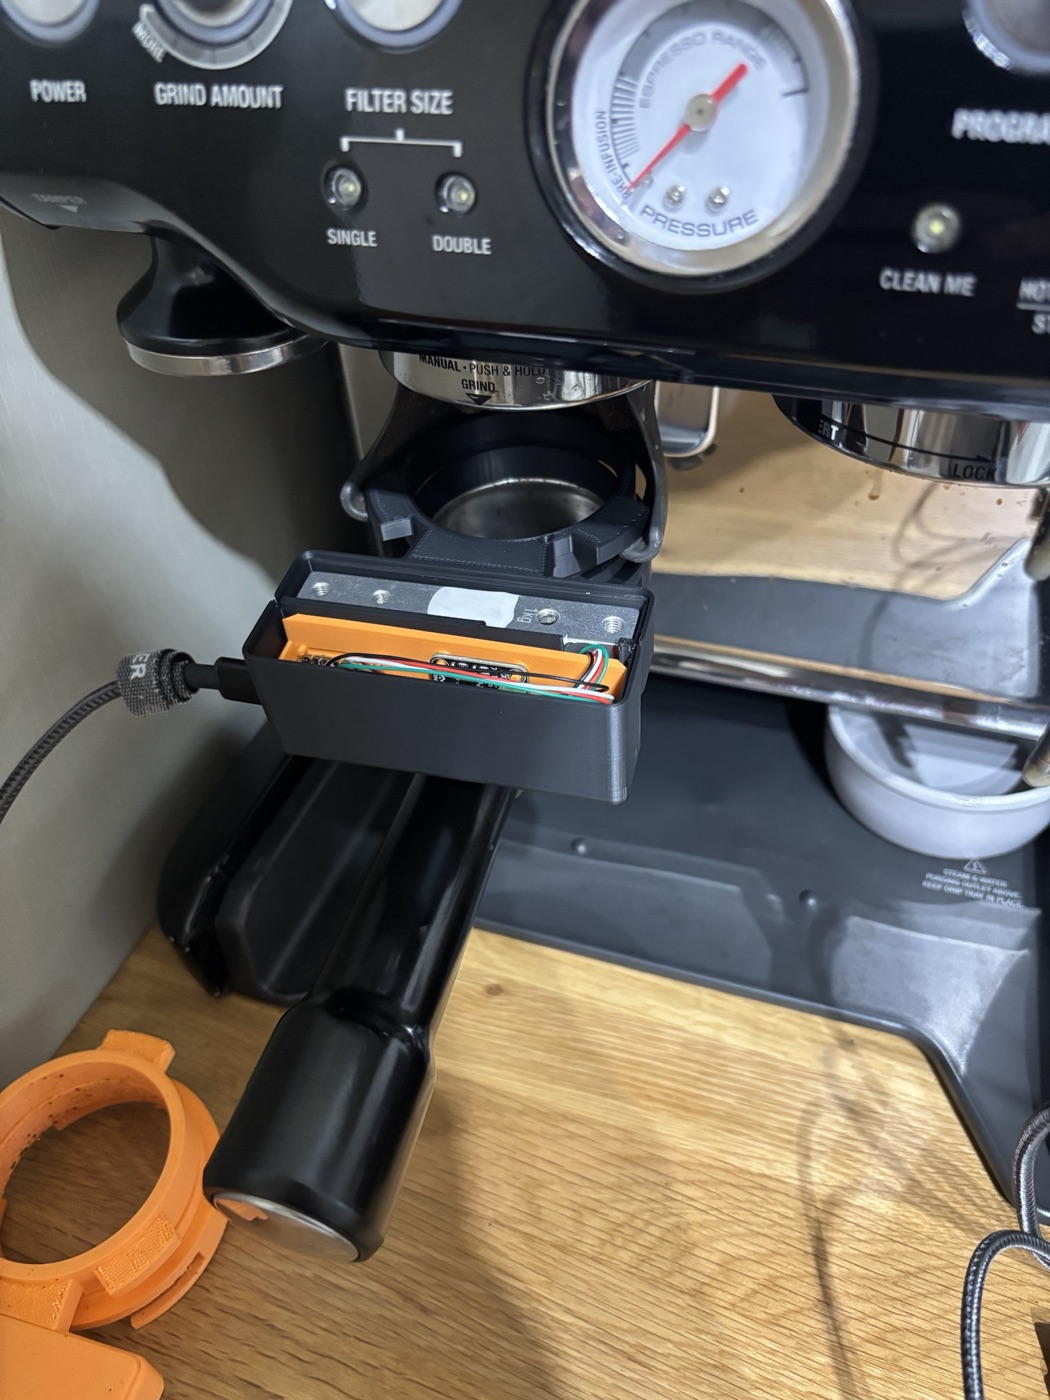
The first try pressed once, saw nothing for four seconds and gave up: the machine was off, and the relay can't start a grinder in standby. One press, no second, exactly as designed. Machine on, armed for 18.0 g with a guessed lead of 1.0 g:
| s from the start press | Weight | What happened |
|---|---|---|
| 0.0 | 0.0 | Start press. Relay ON in the Home Assistant logbook. |
| 0.9 | rising | First grounds. Start delay 0.9 s (the simulator had assumed 0.35). |
| 1 to 11 | 0.6 → 16.4 | Grinding at 1.6 g/s (assumed 1.3). |
| 11.4 | 16.9, trend 17.0 | Stop press. Relay ON. |
| 12 to 15 | 17.27, flat | It worked. About 0.35 g arrived after the press: latency, spin-down, chute. |
| 14.4 | Relay ON, 2.99 s after the stop, with no press from the scale. | |
| 15.2 | 17.3 → 18.9 | The grinder restarted, at grinding speed. |
| 15.9 | Rescue press: the scale saw grounds pouring at the dose's rate. Relay ON. Stopped again. | |
| 21.9 | 18.69 | DONE 18.69 g, "we stopped it, 1 rescue press". The lead didn't learn: rescued doses don't teach it. |
2.99 s is too close to 3 s to be chance. The scale asks the relay to confirm each command, and if no confirmation comes back within 3 s, it sends the command again. The relay had obeyed the stop, but its confirmation got lost. So the scale sent the stop again three seconds later, and on this relay every On is a press, so the repeat started the grinder. (That 3 s is in the ZBOSS library under the Arduino core's Zigbee stack, if you want to look.) The relay should have spotted the repeat by its counter and ignored it. Why its duplicate table missed it I still don't know; a sniffer would tell. It doesn't matter for the fix: a press that is never resent can't be duplicated.
The press now asks for no acknowledgement. The sketch builds the three-byte On frame itself and hands it to the stack with the ack flag off, so it goes out once and never again. A press that is still lost is simply missing, and the dose logic already handles missing: a lost start gets no grounds and gives up, a lost stop gets a rescue press 1.5 s later. The resend had also been working against the rescue, which I hadn't spotted: lose the stop's first copy, the rescue stops the grinder at 1.5 s, then the 3 s resend arrives and starts it again.
The second grind, with the ring emptied, was clean: two presses, two pulses, and it repeated the first one almost exactly. First grounds at 0.89 s, 1.62 g/s, stop press at 16.99 g, settled at 17.34. So 0.35 g arrives after the stop press, not the 1.0 g I'd guessed for the lead. The scale learned 30% of the error on its own (1.00 → 0.80), and I set it to 0.35 from the console to save a few doses. I called it there: enough wasted coffee, for now.
automation morning_coffee
Part one's morning ends in one script that presses POWER, waits, and presses GRIND, each once a day. Only the GRIND press changed. If grind-by-weight is switched on and the scale has been heard from recently, the script arms the scale instead of pressing, waits for the scale's own start press to show up on the relay, and records the dose. If the scale is silent, it does the old timed press, so a dead scale still makes coffee. And if the scale was armed but no start press ever appears, the script notifies and stops. It never presses on the scale's behalf: fail to no coffee, never to a double press.
So that Sunday I ran the script by hand, with the scale on a USB wall plug and the 0.35 g lead:
# times rebuilt from the journal; the lines are the firmware's own
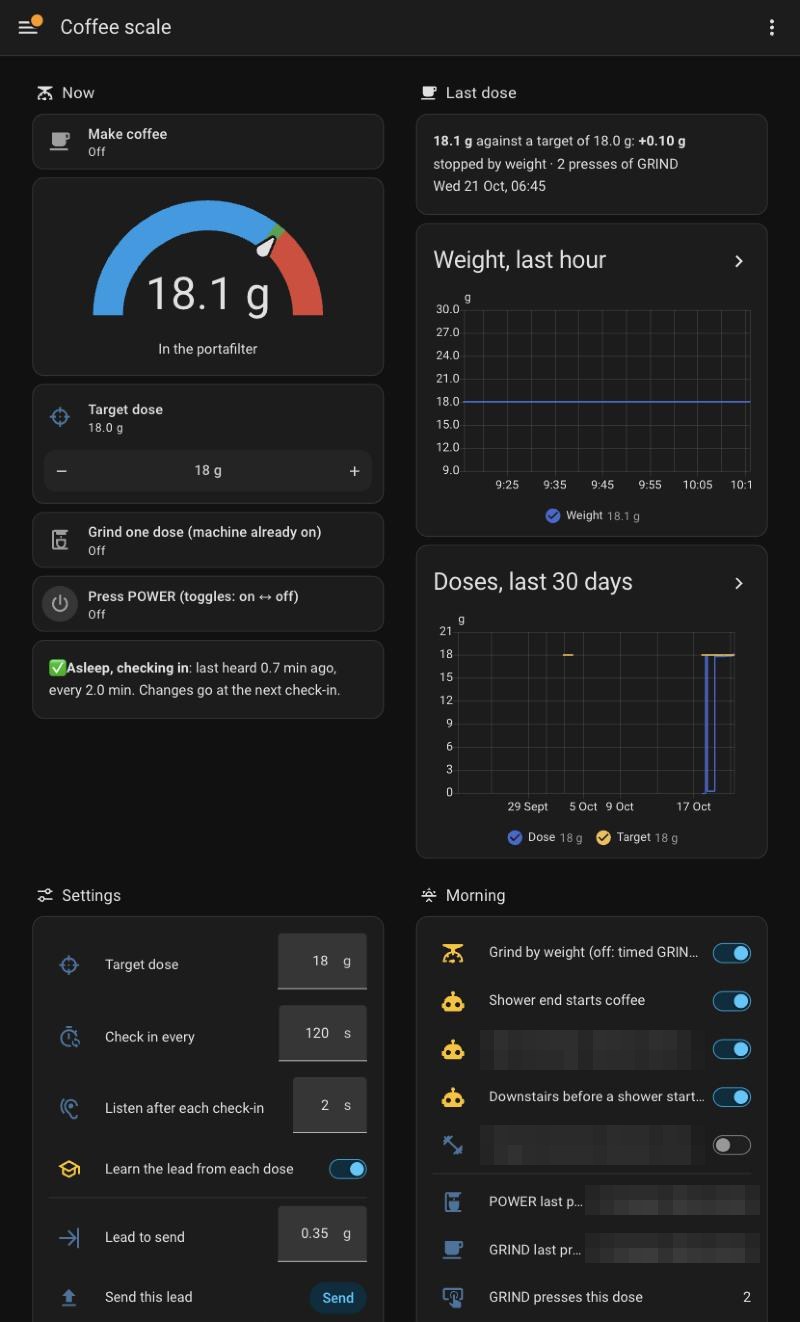
Home Assistant also keeps a Coffee scale dashboard. Every dose shows up there with how many presses it took. Two is normal. One is "no grounds". Three or more is a rescue, and the logbook says why.
sleep check_in_wake()
The bench build was a Zigbee router, a device that stays awake and passes messages on for others, drawing 30 to 80 mA. On a 250 mAh cell that's an afternoon. So on battery the ring is an end device, one that's allowed to sleep, and it deep-sleeps and checks in: every two minutes it wakes, rejoins the network from what it saved in flash, reports every reading and every setting, listens for a couple of seconds, and sleeps. Home Assistant can't write to a sleeping scale, so it keeps the wanted values and sends whatever differs while the scale is awake. If a grind is wanted, the check-in automation arms it. One dose per wake; a late or repeated arm is ignored.
The catch is that a grind can start up to two minutes after it's asked for.
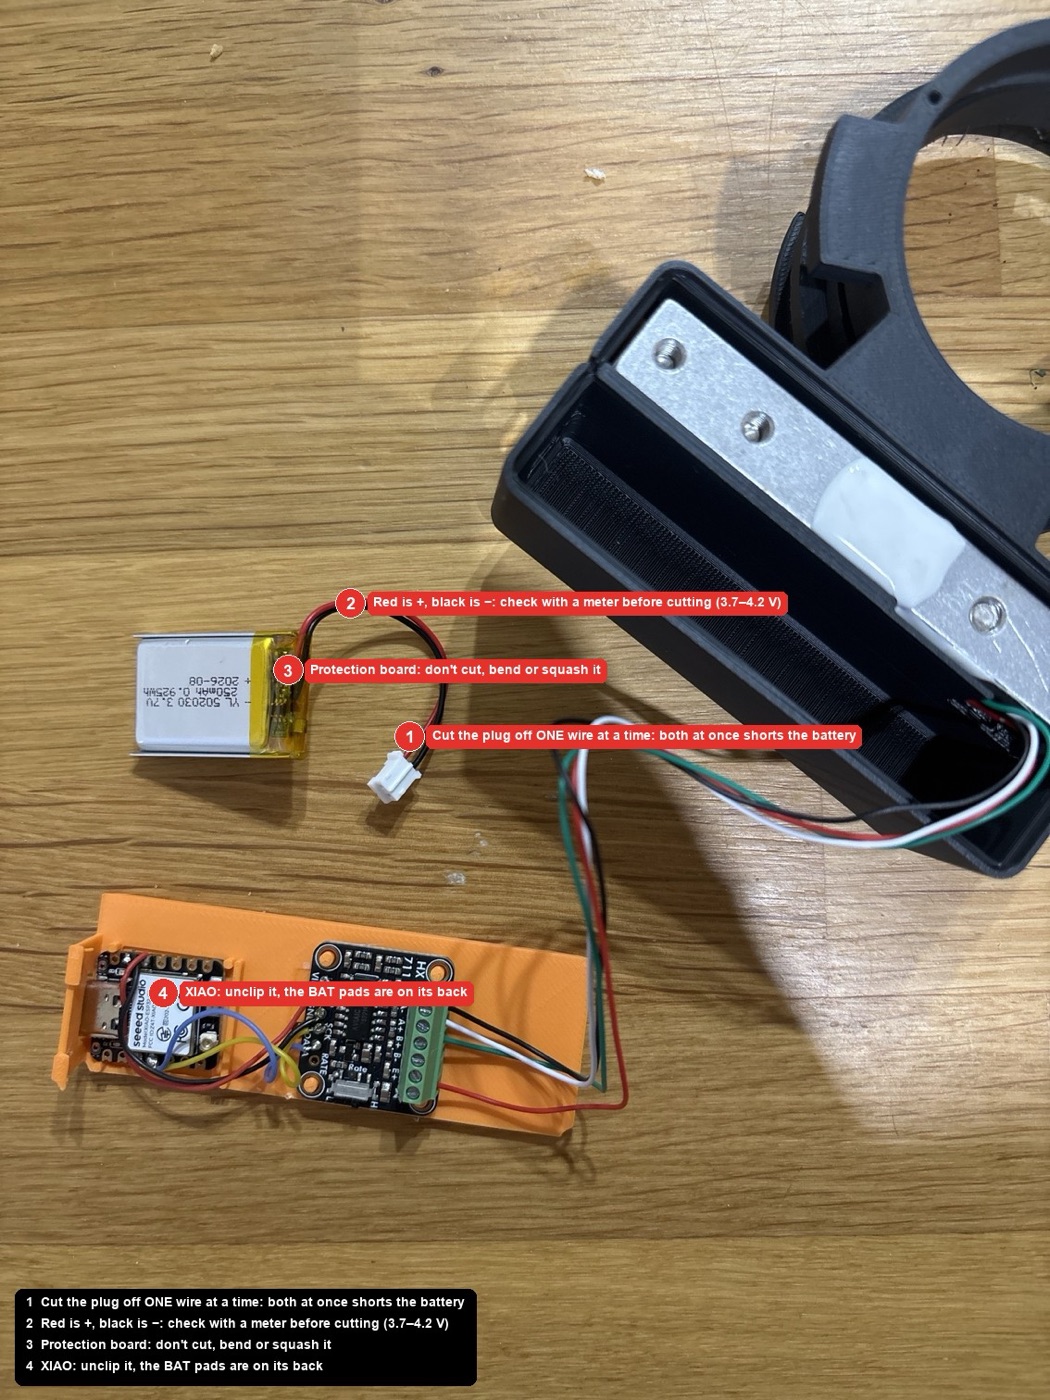
It worked first time next to the laptop upstairs, rejoining in 0.3 s. Downstairs in the cradle it went quiet. With the laptop on the kitchen counter, I found two things wrong:
- A loop in the Zigbee library. When a join times out, the Arduino core helpfully resets the saved channel list to all sixteen channels. The next 8 s join can't finish a full scan, times out, resets again, forever. One slow rejoin after the move was enough to start it. Fix: pin channel 24 before every join, and give a join after a failure 20 s instead of 8.
- A steady 5.5 s rejoin from the cradle, against 0.3 s upstairs. The stack picks the best-heard router whose beacon says it takes end devices, sends it a rejoin request, and waits five seconds for an answer before trying the next. Something near the machine was advertising room for children and never answering. I guessed the two relays inside the machine. I was wrong.
With no sniffer to hand, I made the firmware log what each rejoin hears. If the router it tried first never answers, the scale ignores that router from then on.
First wake after flashing: "slow rejoin: scan at 296 ms, parent answered at 5451 ms; hiding 0x1ad5 (tried first, never answered)." 0x1ad5 is the office presence sensor, a Tuya TS0601. It's a router, its beacon offers to take end devices, it was heard best, and it never answers a rejoin. The relays inside the machine both offer too, but the scale barely hears them through the metal case, at −80 and −95 dBm, so they were never first. From the next wake: rejoin 0.5 s, awake 2.5 s, against 5.5 and 7.5 before.
Battery life is still an estimate, because the current hasn't been measured. At an assumed 80 mA awake, 2.5 s every two minutes is about 37 mAh a day, which is a week on this cell; every five minutes would be two. Battery level needs two resistors from BAT to a spare pin that aren't there yet, so for now it charges on a schedule, not on a number.
export one_page_overview
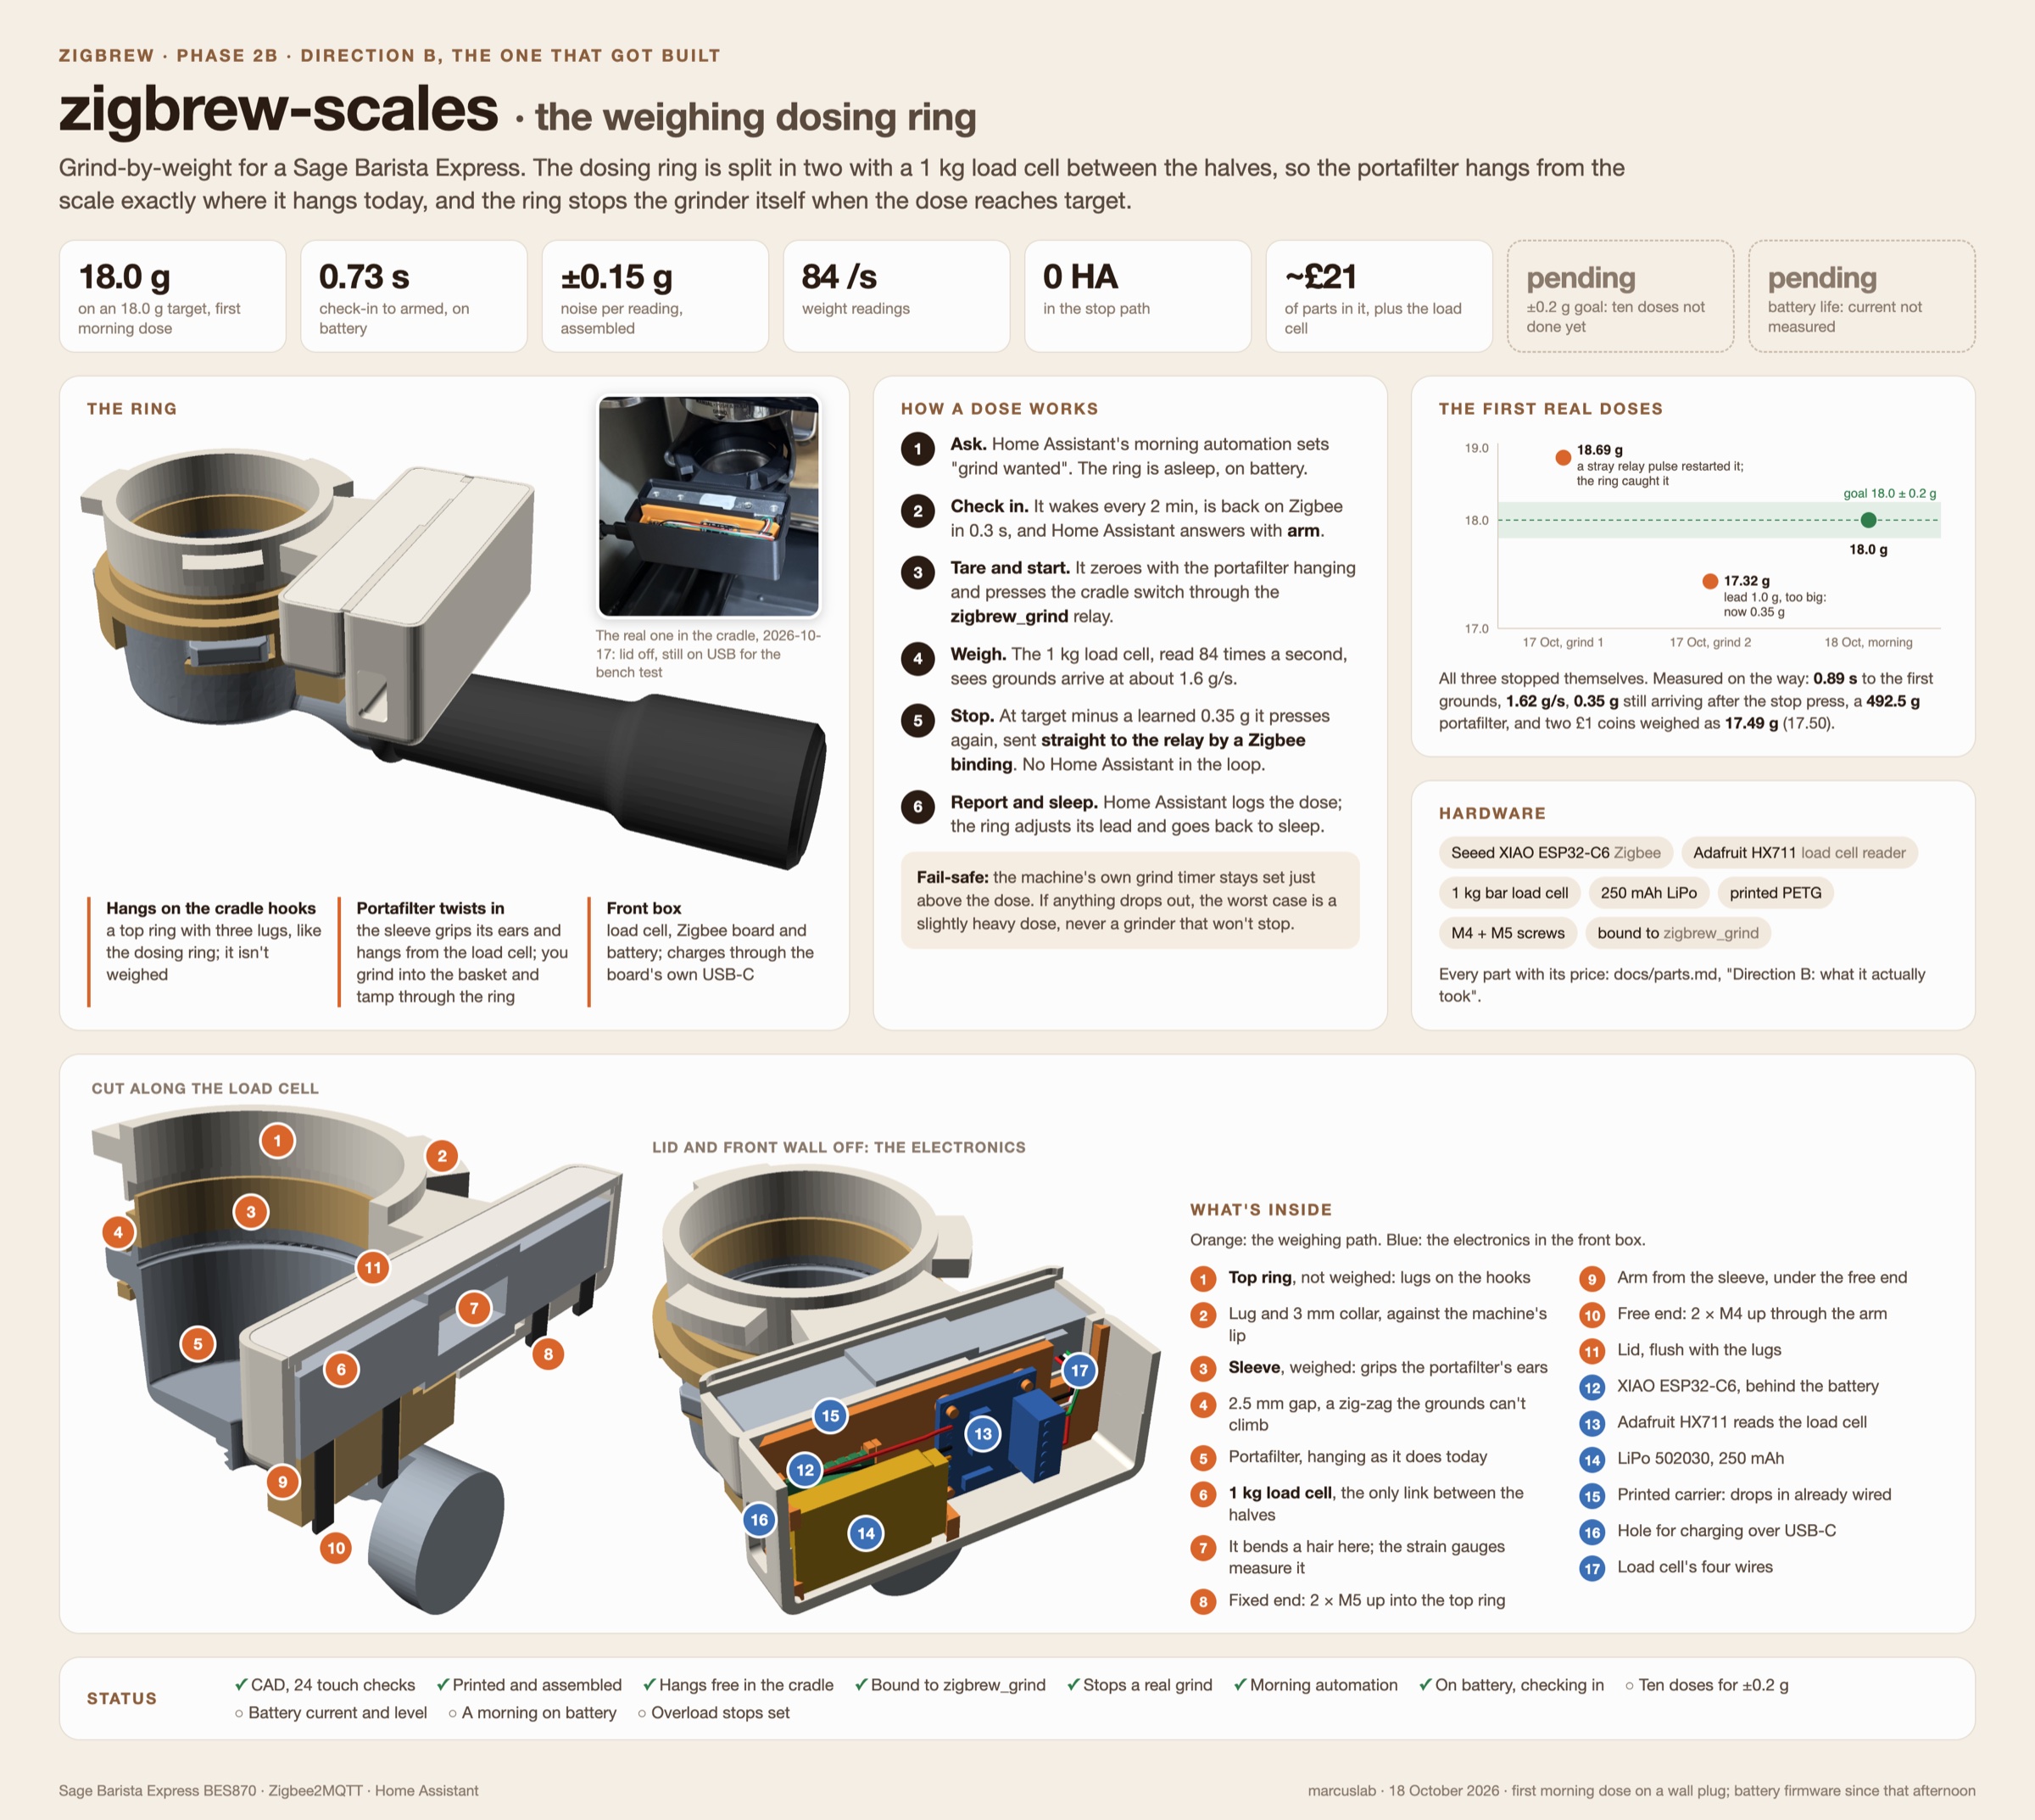
The whole project on one page, numbers as measured.
Revisit the form factor and see if it can be made better. An e-ink display on the ring showing the target and the weight the last grind reached. E-ink holds its image with no power, so it suits a scale that sleeps. And two buttons beside it to adjust the target.
Thanks to espressoshock for the BES870 portafilter model on GrabCAD.